Showing posts with label recipes: breakfast. Show all posts

Wednesday, February 20, 2013

Sunday Brunch Frittata

Frittata is a really hard recipe to write because it can be anything. You can add almost anything to it. The base component of a Frittata is eggs. But you can add veggies, cheese, meat and seasoning to it.  It is just finding a combination that works for you. I love this because it is so great with left overs.  When I put it on the menu it is usually because I have left over veggies in my fridge I want to use up. Last night I made one with mushrooms, onions, red peppers, broccoli, a little pepper jack cheese, potatoes and then some sliced deli turkey slices (chopped the slices into thin strips) I threw in too at the last moment. I used smoked paprika and black pepper as my only seasonings and it was fantastic.  

The one in the photo below, I used for brunch when I had left over roasted peppers and mushrooms. I threw in potatoes and breakfast sausage. A Frittata is great meatless too - I have done cheese, potatoes and spinach and loved it.  I like potatoes in mine because I like the structure of the egg around the potato. But they are good without potatoes too.  


Sunday Brunch Frittata
4 small to medium sized russet potatoes - sliced and cooked - I just boil in the microwave
1/4 cup of bell peppers
1/2 cup of mushrooms
1/4 cup of onions
1 to 2 cups ground breakfast sausage
1 cup shredded cheese
10 eggs
3 tablespoons milk (cream or half-n-half will work too)
Seasonings - your preference - this one I did rosemary, pepper and thyme


Heat oven to 400

In a medium bowl mix eggs, milk and seasonings. Set aside.

In a 10-in. or 12 in. ovenproof skillet, cook sausage over medium heat until browned and almost cooked through. Drain grease and  add in bell peppers, mushroom and onions.  (You could add in potatoes and cook them now too, but I like mine done ahead.) Cook until veggies are tender. Remove from heat and add in cheese. Pour egg mixture over veggies and sausage. Stir once before putting it in the oven.

Cook for 15 to 20 mins until eggs are set.  Cool for 10 mins and cut into wedges to serve.

NOTE
* You can up the veggies to 1/2 cup or 1 cup - I just added what I had left and again that is what is great about a Frittata you really can't go wrong with just adding whatever is in the fridge left over from the previous meals.


Thursday, January 31, 2013

Egg in the Hole

This is an easy, versatile breakfast that has many names. I grew up with my Grandma and Mom calling them Toad in the Hole, but my best friend in grade school had a different name for them - Eggs in a Nest. They are simply an egg in a hole. 

The normal way is to do this in a frying pan, but then that means cooking them almost one at a time. If you are doing several, I find baking them much easier. Plus it allows me to walk away and do other things while they are cooking.

We like even having these for a quick dinner when things have been so busy during the day.  

sprinkled with cheese and ham

Ingredients
serves 6 

2 tablespoons unsalted butter, room temperature, plus more for sheet
6 slices sandwich bread
6 large eggs
Salt and pepper to taste

Optional toppings: grated cheese, finely chopped green onion, crumbled bacon, ham, chopped parsley, sliced avocado, hot sauce, and chopped tomatoes 

Directions

Preheat oven to 375 degrees. Generously butter (or use coat with cooking spray) a rimmed baking sheet. 

Butter bread on both sides. With a cookie cutter or drinking glass, cut a 2 1/2-inch round from center of each bread slice. Place slices and rounds on sheet and bake until golden, 6 to 8 minutes. Remove from oven and flip bread.

Carefully crack 1 egg into center of each slice. Season with salt and pepper. Bake until egg whites are set, but yolks are still slightly runny or cooked hard, 8 to 10 minutes, rotating sheet halfway through (sprinkle with cheese, bacon, ham, onion, if using, during last minute of baking). Serve with desired toppings.

NOTES:
During the holidays - I used heart, star, snowflake shaped cookie cutters.  With Valentine's approaching, I will be doing these for breakfast with crumbled bacon and cheese on top and using a heart cookie cutter on the bread. 

Sunday, June 3, 2012

Simple yet Delicious Breakast

This morning I was looking through my pantry to see what I could possibly feed everyone for breakfast, as it is slim pickings on pantry items right now in our home.  My girls got up far too early (insert before the birds chirp) so breakfast came very early as well (it's not even 8am while I type this and they have eaten breakfast and I have cleaned it up!)


I realized I had just enough ingredients to make popovers.


I couldn't remember the ingredients for them so I wound up using this recipe from the food network website.


Ingredients
1 tablespoon unsalted butter, melted and cooled, plus 1 teaspoon room temperature for pan
4 3/4 ounces all-purpose flour, approximately 1 cup
1 1/2 teaspoons kosher salt
2 large eggs, room temperature
1 cup whole milk, room temperature


Directions
Preheat oven to 400 degrees F.
Grease a 6-cup popover pan with the 1 teaspoon of butter.
Place all of the ingredients into a food processor or blender and process for 30 seconds. Divide the batter evenly between the cups of the popover pan, each should be about 1/3 to 1/2 full. Bake on the middle rack of the oven for 40 minutes. Remove the popovers to a cooling rack and pierce each in the top with a knife to allow steam to escape. Serve warm.


**note**  I was too lazy to break out my food processor so early in the morning so I used a wire disk and everything came out just great!  

We served the popovers with warm honey butter and fresh berries from the farm.  Everyone ate and no one complained!  That's a WIN at our house.
The added benefit of popovers is they are a great addition for any meal.  Serve with fruit for a light breakfast, or serve as a savory bread dish instead of a dinner roll with a nice dinner.  Or stuff them filled with some lunch meat or veggies for a quick on the go lunch.

Enjoy  :)

Saturday, February 18, 2012

Breakfast Pockets

I made the recipe without many changes, but when I make them next time I would like to try another dough recipe as 1/2 cup vegetable oil seems like a lot to me. But the dough baked nice and an even better trait of the dough was when they were reheated in the microwave straight from the freezer they seem to keep moisture and not become dried out.  Sometimes bread can dry out coming straight from the freezer to microwave. These were a hit and nice to just warm up in the morning - especially when on the go.


Ingredients

Dough
1 1/2 tblsp yeast
1/2 c warm water (110 degrees)
3/4 c evaporated milk (110 degrees)
1/2 c vegetable oil
1/4 c sugar
1 egg
1 tsp salt
3 1/2 c flour

Filling
1 lb bulk breakfast sausage
1/4 cup onion, chopped
1 1/2 cups frozen hashbrown potatoes, thawed
1/4 cup bell peppers, chopped
1/4 cup mushrooms
7 large eggs
3 tblsp milk
1/4 tsp salt
1/2 tsp pepper
1/2 tsp garlic powder
pinch of cayenne pepper
1 1/2 cups cheddar cheese, shredded

Instructions

Dough:
In a bowl, dissolve yeast in the water. Add milk, oil, sugar, egg, salt, and 2 cups flour; beat until smooth. Add enough flour until it makes a soft dough but do not knead. Cover and let rise in a warm place until doubled, about 1 hour.  (OR add ingredients in order manufacturer recommends to bread machine and select dough setting. Take out, put in bowl, cover and let rise in a warm place until doubled, about an hour.)

Filling:
Cook the sausage and onion over medium heat until almost browned. Add bell pepper and mushrooms. Cook until sausage is browned and veggies are tender.  Drain. Add the hashbrowns, eggs, milk, and spices. Cook and stir until set. Sprinkle with cheese and keep warm.

Assembling the pockets:
Preheat oven to 350°.
Punch down the dough and cut into 16 equal pieces. Roll each piece into 7 in circle on a floured surface. Top with 1/3 c filling, fold, and pinch shut. Bake for 15-20 minutes.

To freeze:
Allow to cool on the baking sheet. Once cooled, place in the freezer until frozen. Store in a ziploc bag in the freezer for 3-6 months. To reheat, place on a paper towel and microwave for 1 1/2-2 minutes.

Click on title of blog entry and then click print
Print Friendly and PDFPrint Friendly

Monday, January 16, 2012

Lemon Berry Pancakes

Over the weekend we had company and I always enjoy cooking up large breakfasts for company. So this morning was no exception. Since there were many mouths to feed in addition to the standard egg dishes, breakfast meats, and fruit, I also made the pancakes below. They were a hit so I thought I would share the recipe with all of you. Hope you enjoy!


Pancake Ingredients:
2 cups all purpose baking flour (you can use whole wheat baking flour but I find it makes the pancakes a lot heavier)
3 tablespoons sugar
1/2 cup milk
1 (8 ounce container) lemon-flavored yogurt
2 eggs
2 tablespoons butter, melted
2 tablespoons lemon juice
2 cups blue berries

Pancake Topping Ingredients:
1/2 cup red currant jelly (we make our own but you can certainly purchase this at most grocery stores)
3 cups berries ( I used a combo of blueberries, blackberries, and strawberries)

** you can use frozen berries but be sure to thaw them well and drain off any excess water**

Directions:
1. Combine all pancake ingredients in a bowl (except the berries) and mix until smooth.
2. Heat lightly greased griddle or frying pan to 350 degrees or until drops of water sizzle. For each pancake, spoon about 1/4 cup batter onto griddle. Let cook for a few seconds and then add some berries to the pancake. Cook until bubbles form on top and then turn pancakes and finish cooking until cooked through. If they are browning too quickly reduce heat a little bit.
3. Meanwhile, in a sauce pan, melt jelly over medium-low heat. Remove from heat and add berries. Mix until berries are well coated. Serve over warm pancakes.

We like to also either sprinkle with a little bit of confectioners sugar on top or fresh whipped cream.

ENJOY!

Thursday, December 29, 2011

Freezer Breakfast Muffins


These are great muffins to have on hand so that a great grab and go type breakfast. They are savory and not sweet. 

Makes 12 jumbo muffins or 24 regular muffins

1 lb chorizo sausage or bulk breakfast sausage
2 cups Bisquick - I used heart healthy Bisquick
1 cup cornmeal
3 eggs
1 3/4 cup milk
1/3 cup chopped bell peppers
1/3 cup finely minced onion
1/4 tsp salt
1/4 tsp garlic powder
1 1/2 cups shredded cheese - I have used cheddar one time and monterey jack another - both were good

Directions:
Line muffin tins with paper liners and set aside.

Crumble, brown sausage.  Add in peppers and onion and cook until tender. Drain off grease.  

Preheat oven to 375 degrees.  

Mix together bisquick, cornmeal, eggs, garlic powder and milk.  Add drained sausage mixture and cheese. Mix until all ingredients are incorporated. 

Ladle the filling into the prepared muffin tins, filling almost to top. 

Bake for 10 to 15 mins.  Allow to cool completely. 

To Freeze:
Remove all paper liners before placing in freezer. The moisture from the frost and then thawing make the muffins stick to the liner.  For easily peeling of the liners - make sure they are completely cooled down before removing.  Store in large airtight container or ziplock. Or place one jumbo or 2 regular in sandwich bags and then place in large container or ziplock so that you can just pull out easily for a breakfast. 

To Serve and Eat:
Microwave straight from freezer on high for approximately 90 seconds. Each microwave is different so you will have to find that right time for yourself.

Monday, May 16, 2011

Whole Wheat Waffles

Master has a thing for waffles. It's his breakfast of choice, choosing to eat that about 5 mornings out of 7. For awhile I was making them with a standard waffle mix (Aunt Jemima or some such something), but then I got all caught up in the white-flour-is-teh-debil! craze that swept the nutritional world and started buying frozen Kashi whole-grain waffles.

Because I need to keep him as healthy as possible, you see. I'm totally not done with him yet!

Master was not a big fan of Kashi, evidenced by referring to them as "that cardboard shit you're feeding me for breakfast". And though I may have told him to "suck it up, buttercup", the outrageous price of frozen Kashi whole grain waffles offended my cheap-skate sensibilities.

There were 8 in the package, for somewhere between 3 and 4 dollars a box. And because they're small (standard size for frozen waffles, but at 6'4" and 220lbs, Master is not a standard size guy.) he'd eat two waffles a serving, so, 4 servings a box.

I went on a mission, not only to find something cheaper and just as healthy, but to also, hopefully, move out of the cardboard category.

I'm pleased to share the following recipe:

Whole Wheat Waffles

Ingredients

1-3/4 cup whole wheat flour
1/2 tsp of salt
1 tbsp baking powder
2 egg yolks
2 egg whites
1-3/4 cup skim milk
1/2 cup unsweetened applesauce
3 tsp Sugar (or Splenda, if that's your thing)
1 tsp vanilla extract
Optional: a bunch of cinnamon, or whatever else you like

Directions
In a large mixing bowl stir flour, baking powder, sugar and salt.

In a small mixing bowl beat egg yolks, milk, vanilla and applesauce (and cinnamon, if using). Add to the flour mixture all at once. Stir mixture until blended.

In small mixer bowl beat egg whites until stiff peaks form. Gently fold beaten egg whites into original mixture and do not over mix.

(I have no idea why the recipe calls for beating the egg whites separately, but we are not to question such things! Just do as you're told, like the good little submissive you are.... :P)


Pour batter onto preheated waffle maker which has been sprayed with non-fat cooking spray. Cook according to your waffle maker's directions.

The recipe site I got this from listed this as 5 servings with a calorie count of 216 per serving.

Well! I beg to differ!

I got 13 waffles out of this recipe, and a single waffle for us is a serving. I mean, jeez, they're huge!


So my new estimated calorie count for these is right around 100 calories, plus whatever your topping of choice is.

(The recipe analyzer also said there was alcohol in the recipe and damn if I can figure that out. Though I do cook with wine, and I sometimes even add it to the food, I most certainly did not add any to the waffles!)

I couldn't even begin to break down the cost savings as I had quite a few of the ingredients on hand. The only thing I had to buy was the bag of flour and a jar of applesauce, which totaled less than a single box of Kashi, and I'll get who-knows-how-many batches out of them.

I flash froze the waffles, stacked them separated with flattened out coffee filters because I was out of any other non-sticky food separator stuff, popped them in a freezer bag and called it Domestic Service.

To serve, I cut them in half, pop them in the toaster and voilà! Healthy(-er than white flour) and cheap(-er than Kashi) whole wheat waffles, that, best of all, have been declared "better than cardboard!"

Ah. Sweet success!

Saturday, April 16, 2011

German Pancakes

I know I post an awful lot of recipes as compared to cleaning and crafty tips, but I love to cook and cooking for Sir has always been an adventure because he is rather picky and doesn't always want to try new things.

One thing I've found that makes a great Saturday morning brunch is Pannekoeken or German Pancakes. They are easy to make, they puff up very nicely in the oven for great presentation and they are tasty!

I was taught this recipe a long long time ago and while you can go out and buy special pans for this, I have found using a cast iron skillet or other oven proof skillet works just as well. The plus side to this recipe is that you can easily cut it down or make more, depending on need.

Ingredients:

5 Eggs
5 Tbsp Butter
1 1/4 Cups Flour
1 1/4 Cups Milk

Preheat oven to 425, place butter in the skillet and skillet in the oven.

Mix together eggs, flour and milk. Whisk until smooth. When oven is ready, pour batter in the preheated skillet and bake for 20-25 minutes.

The great thing about this bare bones recipe is all the fun you can have topping it. I've used jams and jellies, powdered sugar, maple syrup, fruit, etc.

Friday, June 4, 2010

Friday Favorites

Less Trash to Take Out by Vocal Point - A short little article on reducing paper waste. But also if you just go to Vocal Point, through your free sign up they offer samples. I have gotten a lot of samples, plus then I get $1 to $2 off the product and then coupons to share too.

10 Tips on Finding Decorating Style - I think these are all good tips for finding your own or someone else's decorating style.

You Grow Girl - is a good resource for gardening in a modern world

Real Simple's Top 20 Reference Books - Many I haven't heard of and want to check out but there might be some good books to have in a personal library

Reusable Swiffer Duster - A Tipnut.com find that I think could be interesting to try out. I got one of those Swiffer Dusters free in the mail a few years ago. I just have it sitting in a basket never used it before

Homemade Pancake Mix - to have on hand for whenever

Thursday, March 11, 2010

One Pan

Sunday mornings is one of my favorite times....as we just have a tradition. (I am not saying routine as that sounds mundane and Sunday mornings isn't mundane). We start our morning out by making breakfast together. It started because when I first moved here - there were a few breakfast things that I couldn't make but he could. Such as I couldn't fry an egg nor could I make "round" pancakes. I can do both of those things now but our tradition stuck so that we make breakfast together every Sunday. Though I have to say he is the one who mostly makes breakfast on Sunday. It is something he likes to do and just has some Sunday brunch specialties - that are just his thing. So I asked if I could share one of his Sunday recipes. When his family camped as a boy, they had this dish. They called it One pan but we use more then one pan when making it.

It isn't much of a strict recipe but more like guidelines. It is so easy to make variations of it too.


Ingredients:
1 lb Ground Pork or Turkey Breakfast Sausage - browned
1 dozen eggs - beaten
1 bag frozen hash brown potatoes
salt and pepper to taste


Prepare hash browns according to skillet directions on the package. Season with salt and pepper.


When the hash browns are mostly browned, add the cooked sausage.


Beat 12 eggs and pour over hash browns and sausage. Stir in and allow to cook. Stir every so often until finally cooked all the way through.


Serve! I like to serve in bowls with a little cheese on top. But also some salsa tastes good too.

A good variation is to saute onions, mixed bell peppers and mushrooms and mix in when adding the sausage. Or use ham or crumbled bacon. It just is easy to make this into whatever sounds good.

Serves 6 people. We have left overs for breakfasts during the week.

Download and Print: One Pan

Tuesday, December 22, 2009

Gingerbread Muffins

We are going to be out of town for Christmas this year or otherwise I would be making these muffins on Christmas morning. Last year I made them on the 24th because I wasn't sure how they would turn out but they were a hit! They smelled so good baking and tasted even better!


Gingerbread Muffins
Makes 8 Muffins

1 cup all-purpose flour
1/2 tsp baking powder
1/4 tsp baking soda
dash of salt
1/2 tsp cinnamon
1/2 tsp all-spice
1/4 tsp ginger
3 tbsp cooking oil
1/4 cup brown sugar
1/3 cup molasses
1/3 cup milk
1 egg
1/2 tsp vanilla


Preheat oven to 350. Line with paper baking cups or spray with cooking oil eight muffin cups. In a small bowl stir together flour, baking powder, soda, cinnamon, all-spice, ginger and salt. Set aside.

In a mixing bowl, stir together oil and brown sugar. When blended add molasses, milk, egg and vanilla. Mix until blended. Add flour mixture and mix until blended. Spoon mixture into prepared muffin cups.

Bake for 15 to 20 minutes or until muffins spring back when pressed lightly in the center. If desired sprinkle with powdered sugar. Serve warm or cool.

Saturday, October 31, 2009

Simple Pancake Recipe

I usually like to make buttermilk pancakes but for that rare occasion when I am out of the powdered buttermilk....I just go to this recipe.

This makes 18 to 20 pancakes. I often take the leftovers and freeze. I defrost and heat in microwave.

* 3 cups all-purpose flour
* 4 teaspoons baking powder
* 1/4 teaspoon salt
* 1/4 cup sugar
* 2 1/4 cups milk
* 2 egg
* 2 teaspoons vanilla
* 6 tablespoons butter, melted


In a large bowl, mix the flour, baking powder, salt and sugar. Make a well in the center. Pour in the milk, eggs and melted butter and mix until smooth.

Heat a lightly oiled griddle or frying pan over medium high heat. Pour or scoop the batter onto the griddle, using approximately 1/4 cup for each pancake. Brown on both sides and serve hot.


Happy Halloween!

Wednesday, August 5, 2009

Creme Brulee French Toast

I just came home from being at my parents for two weeks. My sister and I were talking about how much we like french toast. My Mom would make it for us often on Sunday after church. Odd thing is that my Mom doesn't like it. But because she served it and in so many good ways - we have a fondness for french toast. My favorite way to eat french toast though is Creme Brulee French Toast.


I usually create thicker slices - not sure why I didn't this time. I didn't put any topping on it as I didn't want cover up the caramel on the top. The bread just soaks the custard creating a really nice texture. And of course great taste.

Low fat, low sugar version and the regular one together.

Ingredients:
* 3 tablespoons (no-trans fat) margarine or butter
* 5 tablespoons pancake syrup (low sugar/no-sugar or regular)
* 1/3 cup packed brown sugar
* 2 tablespoons plus 2 teaspoons Grand Marnier (or other orange liqueur), divided (or any other liquor that you would like the flavor of)
* At least 8 (1 inch thick) slices of French or sourdough bread (you might need more to cover the bottom of the pan depending on the size of your bread)
* 3 large eggs
* 1/2 cup egg substitute (or 2 eggs)
* 1 1/2 cups (fat-free) half-and-half
* 1 teaspoon vanilla extract
* 1/4 teaspoon salt
* Garnish/Toppings: fresh strawberries or other berries and a dollop of light whipped cream or Light Cool Whip or maple syrup.

Preparation:
1. Coat a 9x13-inch baking dish with canola cooking spray. Melt margarine or butter in a small nonstick saucepan over medium heat. Mix in reduced-calorie pancake syrup, brown sugar, and 2 tablespoons Grand Marnier, stirring until sugar is dissolved. Pour the mixture into the prepared baking dish.
2. Remove crusts from bread and arrange slices in the baking dish in a single layer on top of the brown sugar mixture (enough slices to cover the bottom of the pan...I cut the pieces to make it fit all through the pan).
3. In small bowl, whisk together eggs, egg substitute, fat-free half-and-half, vanilla extract, 2 teaspoons Grand Marnier, and salt. Pour mixture evenly over the bread. Cover well and chill at least 8 hours or overnight.
4. Preheat oven to 350°F. Remove the dish from the refrigerator and bring to room temperature.
5. Bake uncovered 35 to 40 minutes until puffed and lightly browned. Serve with fresh fruit and a dollop of light whipped cream if desired.

Saturday, August 1, 2009

Maple Cinnamon Oat Bread

I love this bread! It smells amazing and tastes just as wonderful. This bread is great in just a regular loaf pan and toasted. But this time I was wanting to use it to make Creme Brulee French Toast. (And that recipe will come in my next post.) So I made this into 2 long loafs that I cooked in my French Bread pan. The bread looks almost like it is wheat bread but it is the maple syrup and brown sugar that given it the nice light brown color.


1 1/4 cup warm milk
3 cups bread flour
3/4 cup oats
3 tablespoons brown sugar, packed
3 tablespoons maple syrup
1 tsp vanilla
1 1/2 teaspoon salt
1 1/2 teaspoon cinnamon
1/4 tsp fresh grated nutmeg
2 tablespoons margarine
1 1/2 teaspoon bread machine yeast

Add ingredients to bread machine pan in the order suggested by manufacturer.
Recommended cycle: basic/white bread cycle; light color setting. But I did it on the dough as I wanted to make creme brulee French toast. This bread though is good all on its own or as toast.

If using dough setting. Shape and then let rise until doubled. Time will depend on the warmth of your kitchen - about 33-45 minutes. Bake 30-40 minutes at 350.

NOTES
* I have used powdered milk and fat free half-n-half when didn't have milk on hand and it tasted just as good.

* I have also used sugar free maple syrup and it tasted good still but didn't have as strong of maple flavor.

* I am sure this recipe could be made just as is by hand also if you don't have a bread machine.

Sunday, June 7, 2009

Biscuits and Gravy

A Sunday morning tradition.

It's the Breakfast of the Gods.

Well, it's the breakfast of the Chubby Gods Who Don't Want to Wear a Bikini this Summer anyway.

I don't know about the rest of you but I figure I'm never going to wear a bikini again. Therefore, we had biscuits and gravy for breakfast.

The first time I mentioned biscuits and gravy over at Under His Hand, I had a couple of folks who live over "across the pond" wondering what in the world I was doing plopping gravy on top of 'biscuits' which are the same as cookies here in the states. When it was put that way even I had to cringe. Gravy and chocolate chips? Ugh!

So, in the interest of wiping that grimace off of the face of our readers from "over there", biscuits here are not the same as biscuits there. Do not, I repeat, do NOT pour sausage gravy over your biscuits. I believe that American biscuits are similar to English scones.

But "Scones and Gravy" doesn't even sound as filling (or fattening!) as "Biscuits and Gravy". So biscuits it is.

There. Now that nothing will be lost in translation, let's get on with it, shall we?

The Cast:


A roll of pork sausage. Hint: Ease your grocery bill and buy that cheap, generic sausage. It makes better gravy because it has more grease. You need grease. Buy the expensive stuff if you must, but you'll only end up adding "grease" in the form of butter. The grease is important!

Milk and flour. Pepper and Lawry's, or plain old salt, are optional and applied to taste.

The biscuits?

I so cheat.

Now, no doubt I'm tarnishing my Domestic Goddess Crown by this admission but I cannot tell a lie.

I can't make biscuits from scratch.

I have tried. And I have failed. Repeatedly.

If you possess the admirable talent of being able to pull fluffy biscuits made by your own two hands out of your oven, then do that. The rest of us will stick with the good ol' Pillsbury doughboy.

Besides, they are "just like homemade!" The little giggling bastard says so.

Step one: Crumble the sausage in a large skillet and start to brown. The size of the sausage lumps depends entirely on how chunky you want your gravy to be. My mom leaves big bite-sized chunks in her gravy. Since I'm not a big fan of hefty chunks of meat (except for Maste-.. oh.. wrong blog. Nevermind.) I'll chop mine up into much smaller pieces.


Meanwhile, make your biscuits. Or, you know, pop open that can. Whichever.


Fry the sausage until it's almost cooked through. That "almost" part is important. I'll explain that later.


If there is not a generous amount of grease in your skillet (because you've gone uppity and used that expensive sausage), then you'll need to plop in a couple of tablespoons of butter to melt.

Remember? No bikinis.

Then sprinkle in some flour.


It's difficult to give a precise measurement for this because it all depends on how much grease your sausage chunks are swimming in. Start with about 1/4 of a cup and stir.


Add more if needed. The grease needs to be absorbed and the sausage pieces need to be coated with flour.


Now, this next part is the step that will make or break your gravy.

Let it fry for another 5 minutes.

This is why you add the flour when your sausage is almost, but not quite, cooked through.

If it's completely cooked through and you still have to fry it another 5 minutes, it'll be crunchy. Blech. Not inedible or anything, just.. blech. Crunchy.

This steps cooks the raw, flour taste out of the gravy. Raw flour gravy IS inedible. So, if you've forgotten and let your sausage cook all the way before adding the flour, do not try and skip this step to avoid crunchy chunks. Just suck it up, do your 5 minutes, and chew your chunks.

Okay? Okay.

Let's move on then.

Next, start adding milk. Pour it on in there. Glug, glug, glug.


Again, it's difficult to tell exactly how much milk to use. Start with about two cups, stir and let it thicken as it simmers. Let them little buggers swim!

Keep swimming! Just keep swimming!

Don't worry. It WILL thicken.
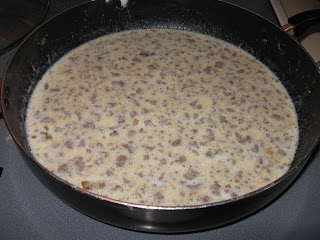


If it begins to look like sausage glue as opposed to sausage gravy, simply add more milk. In about 1/4 to 1/3 cup increments (or just kinda pour-and-pray like I do), letting the gravy simmer and thicken inbetween pours, until you've reached the consistency you prefer. All told, I probably use 3 to 4 cups of milk.

Add seasoning.


Next, take your perfectly baked cheater's biscuits-


Split them and ladle the gravy over.


Optional toppings: Diced onions, grated cheese, eggs. All full of the Nomming.

(The strawberries were added just to make it pretty. I'm not necessarily promoting the taste combination of strawberries and biscuits and sausage gravy.

In fact, the strawberries were left over from chocolate covered strawberries that I had the night before.

Now THAT was yummy.

Chocolate makes everything better, I always say.

Where was I? Oh yeah.)

Serve this to your Man-


-and reap the rewards. This may or may not include permission to go shopping, new purses or many pats on the head.

Hint to mah Man: I accept all of those things. :)

Sunday, March 15, 2009

Muffins and Scone Recipes from Woman's Day

I received a 1 year subscription for Woman's Day for filling out a survey or something like that - it was a while back so I can't remember. Anyway, I got my first issue last week and found a few little good things that I figured I would share every so often this month.

Starting with this link to some recipes for Scones and Muffins. Cranberry Pistachio Muffins recipe is what caught my eye right away though. I think they look really delicious but also they would make a good homemade gift.


ps: I love the star shaped muffins.

Saturday, March 14, 2009

Bulk Breakfast Burritos

Last week when I was looking at Tipnut.com, I came across a link to an article about making "cheap" bulk breakfast burritos for quick morning breakfast. But their cheap - although might be cheap by some standards weren't by mine. The burritos on that site came to .72 cents a piece. I made 20 burritos that ended up being .37 cents a piece.


$2.00 - 20 tortillas - I get tortillas from Sam's Club in a 36 pack (2 packs of 18)
$1.20 - 10 eggs (was going to use a dozen but only had 10 left in that carton)
$1.66 - 2 cups cheese - That is approximate that was in the bag. But I didn't use it all but just using the price for the bag. The cheese is again a Sam's Club purchase where I divide up a 5 lb package into smaller packages and freeze
$1.16 pinto beans - 2 cans - these were what I had on hand but of course doing dried beans in the crockpot would be easy and also much cheaper
.78 Rotel- 1 can - Sam's Club 8 cans in a pack (Rotel is just diced tomatoes with chilies)
.62 green chilies - 1 can - these aren't in the package in the photo because I just needed a spoonful the other day for something so these weren't a full can but I would normally use a full can

Total = $7.42

So 20 burritos would be .37 cents a piece.


I cracked all the eggs into a bowl and mixed well. I then added the can of Rotel and green chilies. I poured into a pan coated with cooking spray. And cooked over medium heat.


Just before the eggs were fully cooked, I added the beans.


Place a good sized spoonful of egg mixture on a tortilla and top with some cheese.


Fold over the sides of the burrito so that they mostly cover the egg mixture


Fold over one end.


And roll up the rest of the way.


On a tray to flash freeze before putting into ziplocks.

To Microwave: I took straight from the freezer and microwaved for 1 minute. I am sure it will vary from microwave to microwave so that might be up to 2 minutes. In the other link it suggested defrosting in the microwave and then cooking. But the ones I made tasted good without defrosting and just microwaving for 1 minute on a plate.

Of course like stated at the link at the beginning there are many variations you could do to these. Add more veggies, different beans such as black beans or add some meat such as ground turkey and sausage.


Edit: 4/9/09 - I made another batch tonight but added a full dozen eggs and got 24 burritos out of it. Kept everything else the same.

Thursday, March 12, 2009

March Questions: Cinnamon Rolls


I read somewhere on your other blog that you make cinnamon rolls on a regular basis, would you mind sharing your recipe? There's just the two of us here, so can you freeze the dough pre-baking? Do you have a small recipe? Any suggestions about cinnamon rolls in general?


It is really sad to say that I don't have set "recipe" for cinnamon rolls. I now make cinnamon rolls using dough from the wet dough recipes from Artisan Bread in 5 Minutes a Day. I usually use the broiche or just their Master recipe. Taking off a 1 pound chunk makes about 7 to 9 cinnamon rolls depending on how thick I slice them.

Before that book I just kind of make them with whatever dough I thought sounded good at the time or had in my freezer. I have made them with doughs for challah, brioche, oatmeal bread and just regular white bread. And again because most doughs I make using about 3 cups flour - that makes usually 7 to 9 cinnamon rolls depending on how big you make them.

I also made most doughs in my bread machine but I am sure could be mixed in a food processor with a dough hook or mixer with a dough hook. Or just old fashioned mixing with hands.

The doughs that I freeze are usually shaped in a loaf shape and then take out and let thaw and rise. And then punch down and roll out following a normal cinnamon roll directions. But actual freezing cinnamon rolls I have only done that once and I didn't have good results in thawing them, but I believe may have been other reasons then actually that they were coming from the freezer. (It could have been my yeast (that batch was at the end to jar so older yeast), it could have been where I had them rising and so on.) I don't see why it wouldn't be possible roll them up, slice them off, I would let them sit at room temp for about 20 minutes so the dough can start doing it's magic then put them on a tray to flash freeze them and then put in a ziplock to pull out what you want to make. I also freeze my cream cheese frosting as it always seems to make more then I want and then I just take it out while I bake cinnamon rolls to thaw a little to squeeze onto the cinnamon rolls after they have cooled from baking a little.

Also here on tipnut.com they have an article about freezing bread dough (not cinnamon roll dough but just thought it was a good resource).

Here is one recipe I have used for cinnamon rolls using my bread machine....

Cinnamon Rolls


Ingredients:
* 3/4 cup water
* 1 egg, lightly beaten
* 2 teaspoons vanilla extract
* 3 cups all-purpose flour
* 6 tablespoons sugar
* 1/4 cup softened butter
* 1 teaspoon salt
* 2 tablespoons dry milk
* 1 1/2 teaspoons yeast

Filling:
* 1/4 cup butter, melted
* 1/3 cup brown sugar mixed with 2 to 3 teaspoon cinnamon


Add ingredients according to manufacturer's suggested order and set on dough cycle. Turn onto lightly floured board. Roll out to a rectangle about 10 X 18 inches. Brush with melted butter; sprinkle with cinnamon-sugar mixture. Starting at long end, carefully roll up; pinch seams together. Measure and cut 1-inch to 1 1/2-inch slices. Place individually in muffin tin or nestled together in round cake pan and let rise about 1 hour longer. Bake at 375 for about 15 minutes. Cool for 5 to 10 minutes and then frost with cream cheese icing.

Cream Cheese Icing
8 tbs (1 stick) unsalted butter, softened
1 1/2 cups powdered sugar
1/4 cup (2 oz) cream cheese
1/2 tsp vanilla extract
pinch of salt
2-4 tbs milk or half-n-half (optional)
Mix all the ingredients except for the cream together in a medium bowl until fluffy. If it's too thick for your tastes, add some of the milk.


I made these with the master dough recipe from "Artisan Bread in 5 Minutes a Day." It has white flecks on the caramel because I had made a pan of cinnamon rolls and used the same spatula to plate it so some cream cheese frosting got on the caramel.


Please feel free to ask a question or several for March Question Month!

Monday, July 7, 2008

Biscuit Muffins


Biscuit Muffins
Makes 12 muffins

2 1/2 cups all purpose flour
1/4 cup sugar
1 tablespoon plus 1/2 teaspoon baking powder
1/4 teaspoon baking soda
1 teaspoon ground cardamom or ground nutmeg (I used cardamom as I am always looking for recipes with it in it)
1 teaspoon salt
10 tablespoon butter, cold and unsalted, and cut into small pieces
1 cup cold buttermilk
1 tablespoon sugar for sprinkling, optional


Preheat oven to 350 degrees. Grease the cups of a standard muffin tin.

In a large bowl combine flour, sugar, baking powder and soda, nutmeg, and salt. Distribute the butter over the flour mixture, and with a fork, or an electric mixer, work in the butter until coarse crumbs are created.

Pour in the buttermilk, and mix using low speed with a mixer, or a fork, until dough forms a sticky mass, about 30 seconds. Do not overmix, you are just letting the dough come together.

Lightly dust a work surface with flour. Dump the dough out, sprinkle the top with flour, and knead gently, 6-8 times. The dough should remain soft and sticky. Cut the dough into 12 equal portions, and place in greased muffin cups.

Sprinkle with sugar, and bake 25-35 minutes, or until golden brown. Remove pan from oven, and transfer muffins to cooling rack to cool for a few minutes before serving.

***I use powdered buttermilk and they came out great! I just made sure the water was really cold and added the powder with the flour mixture.

Tuesday, July 1, 2008

Vanilla Crumb Cake


Makes one 10-inch round coffee cake

Crumb Top
1 1/2 cups cake flour
2/3 cup sugar
1 1/2 teaspoon ground cinnamon
1 teaspoon vanilla extract
10 tablespoons cold unsalted butter - cut into small pieces (1 stick plus 2 tablespoons)


Cake Batter
6 tablespoons unsalted butter - softened (3/4 stick so basically the rest of what was left after the crumb topping)
3/4 cup sugar
3 large eggs
2 teaspoons vanilla extract
2 1/4 cake flour - unsifted
1 1/2 teaspoons ground cinnamon
1 teaspoon baking powder
1 teaspoon baking soda
1/4 teaspoon salt
1 cup sour cream (not fat reduced)

Preheat the oven to 350 degrees (325 degrees for a dark-finish pan). Line a 10-inch springform pan with parchment, grease the bottom and sides and set aside.

To make the crumb top, in the bowl of a heavy-duty electric mixer fitted with the paddle attachment, combine the flour, sugar; and cinnamon. Cut in the vanilla and cold butter on low speed until coarse dry crumbs are formed. Pour into a small bowl and set aside. If not using immediately, refrigerate until needed.

To make the cake batter, without cleaning the mixing bowl, cream the butter and sugar on medium speed until light and fluffy, about 1 minute. Add the eggs, one at a time, and the vanilla extract and beat well on medium speed for 30 seconds. The mixture will be loose. Add the flour; cinnamon, baking powder; baking soda, and salt and beat on low speed for 15 seconds. Add the sour cream and beat on medium-high speed only until the lumps smooth out and the mixture looks fluffy, about 30 seconds on medium-high speed. Do not overbeat.

Spread the batter evenly into the prepared springform pan. Sprinkle the top evenly with the crumb topping. Bake on the center rack of the oven for 45 to 55 minutes, or until the top is crisp and feels firm when gently touched in the center; the cake separates slightly from the sides of the pan, and a cake tester inserted into the center comes out clean (it may be a bit moist; that's okay). Do not overbake, or the cake will be dry.

Remove from the oven and cool in the pan on a wire rack for 5 minutes before removing the sides of the pan. Let cool at least 30 minutes before serving warm, or cover in plastic wrap to serve later at room temperature.

Store at room temperature for up to 3 days.

NOTES:
I made this in a 9x9 square glass cake pan and it worked fine. I have done it in the springform pan and presentation is nice - by cutting into wedges, but works fine in a 9x9 square cake pan too.


LinkWithin

Related Posts Widget for Blogs by LinkWithin