Monday, December 31, 2012

Resolve to change

“If you focus on results, you will never change. If you focus on change, you will get results.” ~Jack Dixon


I'm not sure about any of the rest of you but every new year for as long as I can recall I set about making out a list of things I would like to change.  Usually at the top of my annual list are things like eat better, lose weight, be more organized etc.  It seems that each year the same things hit my list and for the first 30 days or so I make changes.  Sometimes they even stick long term.  Often what really happens is that I fall back into old patterns, and the things that I had all of this resolve and determination to change, well.... don't.

I came across the quote above awhile back while reading some things on change.  It really hit home for me.  If you focus on the end game, nothing changes.  If you focus on change, on being present in the moment, in actually "making" change occur, then you will see results.  Results aren't what happens when you focus on the end, results are what happen when you focus on the process, on being present with whatever it is you wish to alter.

In addition to that, I have found that I do much better when I focus on the positive rather than on the negative.  So for me, if i resolve to donate more time to those who need the time, I can accomplish this by focusing on streamlining other areas of my life to free up my available time.  I can achieve this result if I don't focus on the result itself but focus on what behaviors I need to alter NOW in the moment.  Doing this brings about the desired result.

I have also found that change is not something that happens just once, its something that is on going, its a process, it's effort, it's being present and committed.  It also isn't something we list just once at the start of a new year.  It's something we resolve to do, it's something we focus on doing, it's something we commit to doing, and then with all of these efforts we will achieve what we have set our mind to achieving.

MIT's McGovern Institute did a study that showed that it takes 21 to 28 days to form a new and lasting habit.  So it takes both short term and long term commitment to create new habits.  In the short term we need to commit to spending the necessary month to form the habit.  In the long term we need to commit to reinforcing the habit so that it brings us the desired results.

Also, a good rule of thumb is to be kind to yourselves.  Don't give up and throw in the towel on whatever it is you resolve to change if you fall "off the wagon".  Just get back up and continue on, push forward, and work harder to achieve your goals.  

That's what I plan to continue working on this year.  Creating new and lasting habits to replace some habits that I wish to change or remove from my daily living.  I resolve to be the best me I can be.  That to me is a fluid thing.   it isn't a one time change, it is a constant work in progress that requires effort and dedication.  Out of that, however, good things come my way.

So in closing what was a wonderful 2012 for my family, I wish you and yours a very happy, healthy, and prosperous 2013.  May whatever changes you choose to make stick, may you find peace and happiness with your world and the world of others around you.


Sunday, December 30, 2012

Book Review: You've Got It Made: Deliciously Easy Meals to Make Now and Bake Later

 When I have checked a book out from the library more than 3 times, I think it is time to just go ahead and buy the book.  This book is one I should just accept, I need it among my other cookbooks.  This book's concept is right in the title make it now and bake it later.  It isn't necessarily a freezer recipe cookbook, but many of the recipes in do have freezer instructions. But some recipes are just to make and bake a few days later which helps when you know your week is going to be busy.

The main reason I keep going back to this book is that it has such a variety of recipes that are different.  Most of the make now and bake later type cookbooks seem to be making a big batch of something and then dividing it up and sending it to the freezer or the recipes use similar ingredients and base all the recipes off those main ingredients.  This book just gives you good recipes and tells you what to do to freeze it or just bake it later.  Every recipe in the book to me is guest ready too. Meaning it is perfect to serve for company or give as a gift to someone that ill or just busy and not able to whip up a good home cooked meal.  Many recipes do have a basic recipe and then variations, but still they are so different from what I normally read in these type of cookbooks.  It also has DIVA notes all along the way to give extra tips in making each dish. 


Fagioli Casserole -
Didn't work the way the recipe was written.
By improvising, it ended up being really good.
What I don't like about this cookbook, not every recipe has worked how written for me.  I have had the majority of recipes work, but a few that I had to improvise to make them work.  This cookbook also doesn't have photos which is typical of Diane Phillips cookbooks.  I wish there were photos, but I do know it is cheaper for publishers to not to have them, but I would really love to see how some look before making. 

Overall again, I think this is a book I want even though I have had some adventures in working out a few recipes, the majority are great. 

Often the recipes say use a 9 x 13 and I just use two 8 x 8 since there is only 2 of us and bake one right away and freeze the other for later.  It has worked out really well for me.  

This recipe I am going to share is one that I make quite a bit and also have given away as gifts during the holidays as well as given to friends   who were just coming home from the hospital.  It is always given really good reviews and it is so easy to change it up and use different ingredients. 

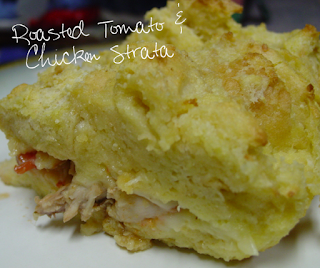
The books original recipe is for an Egg Strata and then offers many variations such as one called Roasted Tomatoes & Mozzarella Strata.  Basically I have taken that recipe and made variations of it now many time. 

So here is my adaptation of the Egg Strata....

Roasted Tomato & Chicken Strata

8 large eggs
2 cups milk
1 teaspoon salt
8 cups torn bread
2 cups grated or shredded cheese
3 tablespoons unsalted butter, melted

2 cups roasted tomatoes
1 cup cooked chicken, shredded


Coat the inside of a 9”x13” (or 2 - 8"x8")  freezer safe baking dish with cooking spray.   

In a large bowl, beat the eggs, milk, water and salt and pepper.  Place your bread in the egg mixture and toss to coat evenly.  

Transfer half the bread mixture into the baking dish.  Top with tomatoes, chicken and 1 1/2 cups cheese.  Place the rest of the bread mixture on cheese.  Sprinkle with 1/2 cup Parmesan cheese and drizzle with 3 tablespoons melted butter.   

Cover and refrigerate up to 2 days or freeze up to 2 months. 

TO BAKE and SERVE:
Thaw in refrigerator overnight if taking from freezer.  Let set out at room temperature for 30 minutes to 1 hour before baking.  Bake at 350*.   Bake for 40 to 50 minutes.  The strata should be puffy, golden and set in the center when done.  Let stand for 5 to 10 mins before serving. 


VARIATIONS:
* ham, Gruyere, spinach
* all veggie - mushrooms, peppers, spinach, tomatoes
* chicken and broccoli with Swiss cheese 


MY NOTES:
*  I have left off the Parmesan cheese and drizzled butter and it has still tasted good

*  In the above recipe I use mostly mozzarella cheese, but have also used all Parmesan. And have even left the cheese out completely.

* In the original recipe it calls for the bread to have the crusts cut off of it. But not sure I have ever seen the need of that and when I made it each way - really doesn't make much of a difference. 

*Stratas are good for breakfast, brunch or dinner. But I almost always serve for dinner. I add a big leafy green salad as a side. 

* I mostly use French or Italian bread, but in a note in the book it just suggests any bread that isn't spongy. A bread with some structure. 

*Once I needed to make it with less milk because the people I was giving it too limit their dairy intake. So I upped the eggs by 2 and did 1/2 cup of water and 2 tablespoons milk. It worked just as well as the original recipe. 

Saturday, December 29, 2012

5 Tips for Saving at the Grocery Store

1. Check market circulars - You can find them online and it will help you plan your menu around what is one sale. Before walking into the store you should know the deals so you can plan properly.

2. Coupons - I will say I am not a huge fan of coupons as often items I buy don't have coupons. But when they do, I use them. I also use swagbucks.com that gives me points every time I use coupons from their website. Those points can can be turned in for gift cards and other items. So I am saving at the grocery store by using the coupons and also saving money through the gift cards I get through swagbucks. Many grocery stores now have digital coupons that they load to a value card which often give you money off things already on sale so make sure to check out your grocery stores website. Not many of my grocery stores double coupons, but one will and so often it can make some items nearly free after using them.

3. Eat First - I know that going to the store when I am hungry always seems to make me buy things that weren't on my list. Something always seems to catch my eye that will make my grocery bill go higher.

4. Skip Convenience Items - pre-packaged cake mixes, salad, meatballs or other items that I can put together and make using whole ingredients for less cost. I will have to say that even though they cost less - sometimes my time is needed elsewhere and so buying prepackaged salad or other items can be worth it to me in the long run. But most of the time I do buy the ingredients and make it myself.

5. Plan & Make a List - By looking at circulars, in my pantry, using the other grocery saving tips to plan my menus or at least know what I need to keep the pantry stocked for many of the standard meals cooked - I can keep to my list. Sticking to that list helps save money.

Friday, December 28, 2012

Friday Favorite


New Years Eve Printables - free party printables
Food and Wine Pairing - a little diagram to help know which wines go with which foods
How Much Food to Serve at a Party - a diagram to decide how much food you need per guest
Crispy Southwest Chicken Wontons - looks like a good recipe to make for a party
Easy, No Cook New Years Appetizers  - just a few ways to put together some quick appetizers

Thursday, December 27, 2012

Planning for Gardening Season

It's hard to believe that we've just past the Winter Solstice and yet I'm already actively planning the spring garden.  Here in northwest Montana, I have months to go before I even start seeds in the greenhouse but the planning is already in full swing.  Those of you in warmer climates may already be starting seeds (and for the record I have a jealous).

Here are some quick and easy ways to get ready for that spring season:
  1. Take an inventory of the seed stash: Look through all the seeds you have on hand and make a list.  Make note of what might be several years old and make a plan to use those up while still viable.  In my experience, even old seed will sprout just not always with as high of a rate as something only a year old. 
  2. Plan the 2013 garden: I use a piece of graph paper and literally plot out where different plants will go.  I compare this plan to last year's actual garden to make sure that I practice crop rotation.  Be sure to look at that list of old seed and incorporate those items into the plan.
  3. Hit the seed catalogs: Let me be honest here, I can get overwhelmed by the sheer variety in seed catalogs, especially the tomatoes but I take it in small bites.  I train my eyes to look for days until harvest so that I'm only looking at plants that will do well in my short season.  Generally speaking I make a huge list and then cull it down until I have a reasonable amount of seed for the garden space.
  4. Review last year's journal: Assuming you had a garden last year and kept a journal, take a quick scan through it and review problem plants, frost dates, insect problems, etc.  Use this information to cull that seed list, too.
  5. List other necessities: Make a list of other things you might need, compost, manure, straw, seed-starting pots, large flower pots, new sprinkler, etc.  Keep this list with you when you hit thrift stores or look through Craigslist, etc.  Generally speaking you can find bargains on this stuff before the season gets into full swing and you'll be all that more prepared.
  6. Ask your neighbors: Run ads on Craigslist, Freecycle, etc. in your area asking for garden plants and other items.  Many gardeners have extra plants they need thinned in their garden and will gladly share with you if you just come dig 'em out.  This is a great way to get berry starts, perennial herbs, and many flowers.  Ask now and follow-up later. 
  7. Plan to have fun: Gardening can be a ton of work but if it's complete drudgery well then it becomes to dread instead of something to look forward too.  When you're hitting those seed catalogs allow yourself to buy something fun or impractical just to see what will happen.  If you have kids, give them the chance to plant a row of whatever they want.  My own father did this to us and it planted a life-long love of gardening and plants in me. 
Happy Garden Planning to you! 

Wednesday, December 26, 2012

Storage Tips for After the Holidays

Re-post from December 2009 with a few added items...

* Store display items together - Such as...do you have a holiday village you put out? Pack them all together so that you aren't going through 5 different boxes just to get that village scene out and up next year. All garland, ornaments and lights for the tree should be stored together. All the decorations that go to a specific room or area packed together such as all the guest bathroom decorations are packed together.

* Save boxes or create ideal storage - I am one of those people that can't stand to save boxes normally. But for holiday items it can come in handy. Do you have a nativity scene with small pieces? Having a box that they fit in perfectly with the other pieces help keep them safe as well as together. Some ornaments are similar - just fit really well into their original box. Boxes might break down over the years so it is impossible to save them any longer, so create your own storage such as gluing plastic cups on to cardboard so that each ornament fits in one and isn't crushing or scraping against others. Or using or making sock divider as many ornaments fit nice in those too. Use egg cartons for small ornaments.

* Label everything - There is a piece of garland I hang in our dining room that just fits. I put that in one of those big big ziplocks and labeled it. Label plastic tubs that have tree decorations or the decorations for the kitchen and so on.

* Holiday Lights - Use a piece of cardboard, a paper towel or gift wrap tubing (cut down) or the original box to wind the lights around. I wind the lights around the whole box and then tuck the ends into the inside of the box. 

* Tool Kit - I have floral wire that I only use for my holiday wreath, thin ribbon that I use to attach Christmas tree ornaments, ornament hooks, spare lights and fuses - all in a little plastic pencil box that gets labeled and also stored with holiday items.

* Storage and Planning for next year - Right now everything fits perfectly into the tubs I have - there can't be one more thing bought. So I need to start thinking of how I will need to store things differently next year as I am sure I will have more holiday decorations. Are there things I can get rid of now? Donate? Repurpose for another holiday? Maybe I want to use the new wreath I bought so the old one can be maybe recycled/recreated for another holiday.

* Time to Save on purchases for next year - After-holiday sales are a great way to save on greeting cards, wrapping paper, decorations, ornaments, lights and storage solutions. Check what you might need a few days before Christmas and make a list of things want to purchase.

* Create a holiday planning book - write down recipes, menus, treats made, decorating things that worked and didn't work, guest and gift lists, what you would like to do next year, measurements that are important - such as you might need a new table cloth next year so write down the size you need while looking for after-holiday sales or any other useful information. Did a certain brand of cranberries work better in your cranberry salad this year? Did you run short on cider? What was a hit on the menu? Did the table centerpiece looks better this year then it ever has? Make a notes and include pictures or anything else that might be helpful. Such as I used Yukon gold potatoes one year so included the tag from the potatoes so I knew which brand I used so I could repeat that for each year after for Christmas dinner.

Tuesday, December 25, 2012

Before the craziness starts...

I realized something this year in talking with some friends.

Not everyone uses spreadsheets to track gift purchases (and budgets) year over year. Or sorts out their weekly menus on the spreadsheet with the corresponding grocery list attached. Or prides themselves on being finished with their holiday shopping and wrapping by early Dec.

I do. I find peace in the organization and structure. Honestly, if I was still wrapping (or buying) gifts at the last minute, I'd be very stressed out.

I have activities planned for the kids and family for each day they are here. I don't do last minute shopping. My pre-holiday baking is done on a schedule. I'll stock up on Christmas wrapping, cards, and ornaments the day after Christmas and already have purposes for them when I pack them up for next year.

This is pretty consistent to how I approach caring for the home. It's all on spreadsheets or on mobile apps. I clean as I go, which means someone cooking in the kitchen with me may find their 'stirring spoons' are cleaned up a few moments after they set them down. When I'm cleaning up the first meal, I'm already planning for two meals down.

I'm not in the moment.
I'm ten steps ahead.
When something unexpected happens, I'm already thinking of how that will impact things down the road.

While in some ways that means I'm an excellent, thoughtful hostess... it also means I'm flitting around in the background, always cleaning or planning when to take dessert out or when is the optimal time for coffee and tea without over-caffienating our guests so we're not wide awake at 4 am. It does make it hard for me to focus since I'm always scanning a room, checking for trash or empty glasses or plates that may need a refill. I rarely sit for long periods because I'm bustling around. My mind doesn't rest.

On Christmas, however, I do my best to take a few moments where I'm not the unfailing hostess with the perfectly timed agenda. Of the craziest of all days, I want to just let it go, and just be.

Be happy.
Be grateful.
Be hopeful.
Be aware.
Love and be loved.

I encourage you, no matter how family-filled and jam-packed your holidays get, to take a few moments to breathe deeply and let it all go. To recharge, and refocus.

Be in the moment, with all that surrounds you.

I know that it is a struggle for me to do so, but that my family is better served by my doing so.

Happiest of holidays to you and yours.

Monday, December 24, 2012

Shhhhh.... quiet now... over here....

That's right ... shhhhh.... let's be very quiet about this next topic... but know that we have all been there at some point in our life.  Be it Christmas, Hanukkah, Birthday, Anniversary, or simply a gesture of good will from another... we have all been the recipient of sometimes the "unwanted present".  Yes that's right, I dared to say it... unwanted present.

If you've gotten this far in your life never to have received a duplicate, or worse yet horrible simply not appropriate present, you are indeed very lucky and should probably go play the powerball Lotto.

With that pretense out of the way, the question always seems to come up post holiday as to what to do with unwanted holiday gifts.  With that in mind, and because most folks are too polite to speak of this with family and friends (let's face it, none of us want to hurt another person's feelings by expressing we didn't just love that golf sweater Aunt Joni purchased for us, or that blender we received at a bridal shower, right along with 10 other similar blenders) the reality still remains the same... sometimes we have gifts that we can't use, don't like, or otherwise don't know how to dispose of.

Here are some suggestions on how to handle just that situation.

Return the item: If you are fortunate enough to have a gift receipt or other receipt, return the item for store credit or cash.  This is always your first and best option for dealing with an unwanted present.

Re-Selling:  If you aren't able to return, perhaps you know of someone who is looking for the item that you have and is about to go purchase it.  Rather than them purchasing from a store, perhaps they would be willing to purchase the item from you.  Allowing them the much wanted item and you the much wanted cash.  Or if you don't know of someone you can always use sites such as ebay, craigs list, or local groups on sites such as Facebook or twitter, to sell your wares.

Donation:  You can always bank some karma bucks by donating the duplicate or unwanted items to a local charity.  So many charities are looking for all sorts of items and are happy to take new never used items off your hands.

Re-gifting:  This idea does not sit well with me personally, but there are certainly plenty of folks  who utilize this option... the re-gift.  This is where you wrap it up and give it to another unsuspecting individual.  Plenty of people like the re-gifting option so perhaps it works for you.

If none of the above suit your needs, then you could always put it to the curb (I never recommend simply holding onto an unwanted item as your home may then resemble an episode from hoarders).  I'm fairly certain if you don't want to take the time to donate the item that your trash man may very well find a use for the item even if he only donates or sells it himself.

I also recommend in order to avoid the problem of duplicate presents, especially when it comes to things like baby showers, bridal showers, grooms parties, go ahead and register somewhere so that people know the things you need, like, and desire.  This saves everyone a lot of time and effort and the need to do any of the above becomes unnecessary.

So whatever your situation, I hope the above is helpful this holiday season and that your holidays are merry and bright.

Sunday, December 23, 2012

Christmas Cheers

During the holidays, there is a lot of baking, cooking and drink mixing that goes on.  Recipes range from simple to very complex.  And while I will make elaborate desserts or side dishes, I have a hard time making drinks that are anything but simple!

Here are two recipes I rely on during the holidays


Egg Nog

(Note: this recipe uses raw eggs.  I have been making the non-alcoholic version for over 30 years.  I have never had a problem  However, if you are pregnant or have a weakened immune system, then you may not want to use this recipe.)


5 egg yolks
3/4 cup sugar
1 cup heavy cream
2 cups milk
1 tsp vanilla
1/2 tsp fresh grated nutmeg (+more for garnish)
1/4 cup spiced rum*

Put eggs, sugar, cream, milk and vanilla in the blender.  Blend on high until smooth and creamy.  Add nutmeg and rum and blend on low till well mixed and frothy.  Pour into glasses/mugs and top with fresh grated nutmeg.  Serves 4.

I use fresh grated nutmeg because it has a better flavor then dried.  If you have never had it, you might find that you want to put it in everything after you try it!


Warm Cider and Rum Punch


(This recipe comes from Martha Stewart's Every Day Food, December 2010)

8 cups apple cider
1 apple sliced thinly
1 orange sliced thinly
2 cinnamon sticks
1 inch section of peeled ginger
2 cups dark rum*

Combine all ingredients in a pot and place over high heat.  Bring to a boil, reduce heat to low and simmer about 5 minutes.  Remove from heat and add 2 cups rum.  


*For both recipes I used Captain Morgan's Spiced Rum.  I prefer it to dark rum, but that is just my preference!

Saturday, December 22, 2012

Creating Vinaigrettes

Vinaigrettes are so easy to make and are all about flavor.  Building amazing flavor to add to a salad.  Bring a salad to a meal at the holidays is always a fresh choice when we are eating such rich foods.


1.  Start with finely chopped ginger, onion, capers, shallot, garlic or herbs.  Honey, Dijon mustard or soy sauce also add great flavor.  Salt and pepper are always needed too for seasoning.
2. A vinaigrette needs acid - which comes from the vinegar....add red or white wine, sherry, cider or balsamic vinegar or lemon or lime juice will also work as an acid.
3. Add oil - olive oil is what I use the most, but safflower, vegetable or peanut oil. I like to do 2 to 1 ration or 3 to 1.  1 part acid or 2 to 3 parts of oil.
4. Mix - shake in a jar,  combine in a blender or  whisk in a bowl (don't use a metal bowl as it reacts to the acid and throws the taste of it off.)   I like using a jar and then just store it in for up to 3 days in the fridge.

Combinations to try:
* Garlic, thyme, Djon mustard, red-wine vinegar and extra-virgin olive oil
* Shallot, cilantro, roasted jalapeno, lemon juice, extra-virgin olive oil
* Shallot, honey, orange zest, lemon juice, extra virgin olive oil
* Shallot, tarragon, sherry vinegar, extra virgin olive oil
* Balsamic vinegar, extra virgin olive oil
* Oregano, parsley, garlic, white wine vinegar, extra virgin olive oil
* Ginger, garlic, honey mustard, soy sauce, rice vinegar, extra virgin olive oil
* Raspberry Jam,  honey mustard, white wine or balsamic vinegar,  extra virgin olive oil

Friday, December 21, 2012

Friday Favorites

How to blanch Vegetables - a basic for cooking, but something really I at times forget how to do

Last Minute Homemade Food Gifts - a list of some homemade gifts that you might have ingredients right in your house. Want to point out that I made Katie's Coffee Liqueur as my last minute gift and just stuck a tag on it saying "good after" with a little calendar on it and the date circled. Great last minute gift! It TASTES so good too! I had some last night and it was FAB!

Peppermint Bark Cookies - just look so festive and yummy!

Hostess Do's and Don't  - from Martha Stewart

Snowman Ornaments - a little craft to do with kids


Thursday, December 20, 2012

Mocha Roasted Almonds

These yummy snacks make great party fare, awesome little treats for gift baskets, and truly yummy snacks to keep in the office drawer.  I imagine you could easily swap any nuts for almonds if you liked something else better.

Mocha Roasted Almonds

  • 4 Cups Whole Almonds
  • 2 Egg Whites, Beaten
  • 1 teaspoon Coffee Liqueur or Vanilla Extract
  • 3/4 Cup Brown Sugar
  • 2 Tablespoons Cocoa Powder
  • 2 teaspoons Instant Espresso Powder
  • 1/2 teaspoon Salt

Preheat oven to 275 degrees.

Mix together brown sugar, cocoa powder, instant espresso, and salt.  Beat together the egg whites and coffee liqueur until frothy.  Pour the egg white mixture over the almonds and toss together, add the spice mixture and stir until the nuts are coated.

Spread onto a parchment paper / silicone sheet lined baking sheet.  Bake for 45 minutes giving the nuts a stir every 10 to 15 minutes.  Allow to cool before storing in an airtight container. 

Wednesday, December 19, 2012

Buttery Rolls

I made these rolls for Thanksgiving and will make them again for Christmas.  They will be my standard go-to roll recipe from now on because they had such a great buttery flavor and held their shape and texture so well.  


3 1/2 cups All-Purpose Flour or bread flour
2 teaspoons instant yeast
2 tablespoons potato flour or 1/4 cup instant potato flakes
2 tablespoons sugar
1 1/2 teaspoons salt
4 tablespoons soft butter
2/3 cup lukewarm water
1/2 cup lukewarm milk

Topping
2 tablespoons melted butter

Combine all of the dough ingredients in a large bowl, and mix and knead — using your hands, a stand mixer, or a bread machine set on the dough cycle — to make a soft, smooth dough.

If you use your hands or a mixer instead of a bread machine - place the dough in a lightly greased container — an 8-cup measure works well here. Cover the container, and allow the dough to rise for 60 to 90 minutes, until it's just about doubled in bulk.

Take the dough from the container or bread machine and gently deflate the dough. Transfer it to a lightly greased work surface.

Divide the dough into 16 equal pieces, by dividing in half, then in halves again, etc. Round each piece into a smooth ball.

Lightly grease with butter or cooking spray two 8" round cake pans. Space 8 rolls each pan. You can use use 9" round cake pans or a 9" x 13" pan, but, the rolls won't be spaced as close together, so their sides will be a bit more baked.

Cover the pans, and allow the rolls to rise till they're crowded against one another and puffy, about 60 to 90 minutes. Towards the end of the rising time, preheat the oven to 350°F.

Uncover the buns, and bake them for 22 to 24 minutes, until they're golden brown on top and the edges of the center roll spring back lightly when you touch it. 

Remove the buns from the oven, and brush with the melted butter. After a couple of minutes, turn them out of the pan onto a cooling rack.

Serve warm. Store leftovers well-wrapped, at room temperature.

Yield: 16 buns.

Tuesday, December 18, 2012

Menu planning for a week of family

My holidays mean I'll be having lots of extra visitors in the house during the week of Christmas to New Years. Specifically, in our case, we'll have a future mother-in-law, three tweens, and several out of town guests staying with us. For me, hostessing will not only mean keeping the house clean, laundry caught up and having several evenings where we host game nights or holiday events, but managing all the meals-- and this is during my "vacation". No small feat.

So I've started to plan out meals, taking into consideration any dietary restrictions and allergies as well as family traditions. I also started to make ahead a few things so I can whip them out of the freezer and into the oven while entertaining guests without spending hours in the kitchen.

Why plan ahead? It allows me to make sure we're eating healthy, balanced meals even in the midst of the holidays. It keeps me from being on autopilot and serving chicken for four days straight. And it helps to eliminate last minute runs to the grocery for forgotten ingredients for spur of the moment dinners. I even plan how to use the leftovers creatively so it's not just a case of "last night's dinner... warmed up". Best of all, it saves money and time.

Getting started:
  • I use spreadsheets. :) The first page has a week's worth of days, broken down into meals (even breakfast) and allowing for afternoon snacks and a dessert. I insert direct links to recipes if I plan on using one specific one. The second page is the grocery list that will be generated from the meal plan.
  • I check the pantry, fridge and deep freeze inventory first. If there's anything I already have on hand that I want to use, I populate the spreadsheet accordingly. I don't want to buy anything I already have on hand... especially during the holidays.
  • I check my grocery ads to see if there's any specials I want to take into account when selecting recipes.
  • I plan on buying once, using twice. If hamburger's on bulk sale, I may make half of the ground meat into tacos one night and save the rest for slow cooker sloppy joes, but brown up all the meat at once and THEN divvying it up into the two batches for separate meals. Leftover roasted chicken can be shredded for a tortilla soup for later in the week, or a quick chicken salad with pita chips... so I tend to roast extra because I already have uses for the leftovers in mind.
  • Look for common ingredients in different recipes so you can buy once for multiple dishes.
  • I also plan out my hors d'oevres when having people over to be sure I'm not missing anything.
  • I pull out my tried and true recipes, but usually add in one or two new ones to keep it interesting for me. Pinterest is a good resource. So is epicurious. If they are available, I always read the reviews to see if there's something to account for it making the recipe (did the majority of the people complain about not enough seasoning? Is the cooking time off?)
Getting into it:
  • I make ahead casseroles the week or two before, double up the recipe and freeze the extras into smaller portions so that it's a great side to pull out and just stick in the oven. Rice broccoli casserole freezes well. Baked mac and cheese does as well. You can also freeze twice baked potatoes. That way, all I need to do is roast up some meat, toss together a quick salad or steam up a bag of veggies and I'm all set. My prep work has been halved... and so has my cleanup.
  • Fresh herbs brighten and refresh frozen dishes you prepared in advance. Frozen lasagna? Chop up fresh basil and parsley to sprinkle onto it before serving.
  • My recipes for banana bread and pumpkin breads always seem to make two loaves, so I wrap them up well and freeze them. Same with muffins. I defrost the day before for a quick breakfast- I usually have some yogurt, fresh juice and fruit to complement the breads and they can help themselves to breakfast while I am sleeping in :)
  • I cook what I can for Christmas dinner in advance so that the actual work on that day is minimal. I want to be refreshed and focused on family.
  • I have quick standbys in case things don't work out. I tend to grill up extra chicken breasts for my own salads so I always have extra on hand. In my case, it's salad with grilled chicken and the always present frozen bags of steamable veggies. I also have homemade soups frozen in smaller batches on hand for a quick meal of salad, soup, and crusty bread.
Simple Desserts:
  • I have a homemade pound cake in the freezer, waiting to be defrosted. My menu plan gives me the head's up when to defrost it so that it's thawed for the next day's dessert. Fresh berries and whipped cream are a quick complement.
  • Each time I made Christmas cookies, I held back a dozen or so of each recipe to freeze in small balls with cooking instructions Sharpied onto the ziplock bag. I can bake as many or as few as I want- straight out of the freezer and onto the baking pan, and have a variety of fresh cookies made by the time I've made the eggnog or hot cider.
  • I also keep vanilla ice cream and a 2 liter of root beer on hand for rootbeer floats (possibly one of the simplest treats out there).

Monday, December 17, 2012

Holiday Themed Pot Luck Party

If you are anything like Himself and I (and our littles) the month of December is a whirl wind of busy and it feels as if you are always on the go.  This year I am determined to change that up a bit and carve out some time to enjoy friends.  We are always so busy with family obligations and commitments that we don't spend nearly enough time with our "family of our choosing"... our friends.

So this year I got the bright idea (hopefully so?) to host a holiday themed pot luck party.  I wanted to do a theme, to kind of create some fun and excitement around an ordinary pot luck.  So we decided upon Christmas Around The World.  Each family coming is bringing a different dish from an area of the world that is traditionally made at either Christmas or Hanukkah.  It should turn out to be a tasty evening for sure.

When throwing a pot luck you can either let the menu be carved out by the individuals ideas of what to bring (be aware, however, this can lead to everyone bringing a pie or a plate of cookies), or you can assign different dishes that you want people to bring (some people resent being told what to bring), or you can put guidelines or a theme.  (this is my preferred method).

In the case of our theme from Christmas around the World, I instructed 1/3 of my guests to make an appetizer , 1/3 to bring a main dish, and 1/3 to bring a dessert.  I allowed each of them to choose what region from around the world (this should make it fun).  They are also going to bring copies of their recipes in case others enjoy the dish and want to make it at home.

We are also doing a White Elephant exchange (also known as Yankee swap, gettem keepem, and a whole host of other names).  Essentially you set a dollar limit for a gift.  Everyone attending brings one gift.  you don't label who anything is from.  Then you draw a names or numbers from a hat to determine the order that people pick a gift from.  You can then either pick a gift from under the tree, or pick one that was already picked.  We have a rule (some don't use this rule) that you can't "re-pick" a gift more than twice.  So when a gift is picked a total of 3 times, its with it's final home.

The advantage to hosting a pot luck with a White Elephant type of exchange, is it lowers the cost of parties for all involved, everyone gets to enjoy a variety of good food, gifts, and camaraderie, and you aren't on the hook for the entire event.  A win for everyone.

It does take a little bit of organization prior to the party but you won't regret that effort spent when you are enjoying a fun evening with friends.

If you've never hosted a pot luck party, here are some links you might find useful to guide you in your first endeavor.

How to Throw a Holiday Potluck Party

Pot Luck Themes

How to host a potluck

10 crowd pleasing pot luck themes

Hope your next potluck or first potluck as the case may be turns out to be just as much fun as I'm sure we will be having this month with ours.


Sunday, December 16, 2012

Andes Mint Brownies


I was going to do a great post this week about making homemade Egg Nog, but I've been under the weather and haven't really felt up to it.  I promise, however, I shall post it NEXT SUNDAY and how appropriate since it will be right before Christmas?  And we will all need a drink to celebrate surviving the Mayan Apocalypse!

This week, I needed to come up with something FAST for a holiday party at work.  Something EASY.  So I  made...


Andes Mint Brownies


Ingredients:

One box of ANY Brownie Mix.
Whatever ingredients you need to make those (usually 1-2 eggs, vegetable oil, water)
2-4 boxes of Andes Mints (my boxes had 28 mints each)

Following the directions on the box, make the brownies!  I used Duncan Hines Milk Chocolate Brownies for mine, but whatever is to your taste, as long as they are not frosted brownies.  While they are cooking, unwrap your Andes Mints and try not to eat all of them!  For my recipe, I used a 9x9 pan and I used a box and half (42 mints).

After the brownies are done baking, and while they are still hot, lay the mints across the surface of the brownies.  As you are laying them across, the heat from the brownies will make them melt.  When you have the desired amount of mints melting on your brownies, take a small spatula ans spread the melted mints across the top of the brownies.  Again, for a 9x9 pan, I used 42, use more if you want a thicker layer.   If you are using a 9x13 pan you will probably want at least 3 boxes.

And that is all!  Cool and serve!

(Sorry I don't have a picture of the brownies but well, by the time I thought of it... they were 3/4 gone!)  They were a big hit in my office!

Saturday, December 15, 2012

10 Tips for Cooks

1. Keep knives sharp - trying to cut through caramels or meat with a dull knife isn't easy and wastes your time when especially in time such as the holidays when people get so busy. 

2. Cleaning up as you cook always saves time and keeps things more organized.

3. Always read through recipe before cooking.  It is better to know ahead of time that a recipe has to chill for 24 hours before baking so that you don't waste time.

4. Put the oldest first in the pantry and fridge.  Making sure you use the oldest items first so you aren't throwing things out because they were buried in the back of the fridge saves you money.

5. Don't try a new recipe or use a new ingredient for important people like a boss, a date or fiances parents. Try a tried and true recipe for those kind of occasions. 

6. A recipe is just a guideline. If you don't like thyme, but like another herb make some substitutions for things you like.

7. Taste before you serve so you know if it needs something else - like salt or pepper.

8. Do prep - the night or day before.

9. Make extras so that you can freeze it for a later time.

10.  Music on, shoes off,  glass of wine in hand, singing and dancing as you cook - enjoy your time in the kitchen.

Friday, December 14, 2012

Friday Favorites

DIY Cleaners and Water - it is a really good read. I know that when I started out making my own cleaners, I used water straight from the tap, but somewhere along the way I read something about distilled water and it was a moment that  made complete sense to me, but never had thought about it before. By the way - the whole Crunchy Betty site has so much good info for trying to live more sustainable. 

DIY Hostess Gift - this is a cute and inexpensive gift to make

Vintage Christmas Stickers - free printable 

Spicy Gingerbread Cookies with Citrus Glaze - these look so yummy to me just not sure they will make it the list this year, but maybe next year. 

Party Planning Free Printables - looks like some good worksheets to plan a party

Thursday, December 13, 2012

Coffee Liqueur Two Ways

Looking for a quick last minute gift idea or just a way to fill up your liquor cabinet in a frugal manner?  Here is two ways to make coffee liqueur depending on the time you have available:

Coffee Liqueur - 1 Month Method

  • 1 Vanilla Bean, split and chopped fine
  • 2 Cups Sugar
  • 2 Cups Water
  • 1/2 Cup Instant Coffee
  • 1 1/2 Cups Vodka

Combine the chopped vanilla bean and sugar in a saucepan, add 1 and 1/2 cups water and simmer for 10 minutes.  Combine the instant coffee with 1/2 cup water and stir until dissolved.  Add the dissolved coffee to the sugar syrup and allow to cool.  Add the vodka and let steep in a cool dark place for one month.  Strain the vanilla bean and bottle for gift giving or drinking.

Coffee Liqueur - 3 Day Method

  • 2 teaspoons Vanilla Extract
  • 2 Cups Sugar
  • 2 Cups Water
  • 1/2 Cup Instant Coffee
  • 1 1/2 Cups Vodka
Combine the sugar and 1 and 1/2 cups water in a saucepan, simmer for 10 minutes.  Combine the instant coffee with 1/2 cup water and stir until dissolved.  Add the dissolved coffee to the sugar syrup and allow to cool.  Add the vodka and vanilla extract.  Let flavors marry for three days in a cool dark place.  Bottle for gift giving or drinking.

Wednesday, December 12, 2012

After the Party

The party has ended and now you have lot of leftover food, wine and decorations.  Here are some ideas to help you use them in other ways....

1. Food
* Omelets, Quiche or Frittata - leftover veggie trays, sandwich meats, sausage, and cheese
* Chips or Bread - leftover chips or left over bread can be ground into crumbs and frozen to use on the tops of casseroles
* Dips - use in a casserole or as a sandwich spread 


2. Wine
* Freeze left over wine in an ice cube tray to use in recipes later. Such as stew in the slow cooker.

* Pour wine into a smaller bottle and recork.
* Make a mulled wine syrup to serve on top of pancakes, ice cream or fruit 


3. Decorations 

* Use ornaments and garland for wrapping gifts 
* Christmas lights - are great fairy lights to use all year around the house 
* Wreaths can be converted to holiday wreaths for other holidays or celebrations 
* Greens - evergreen tree, wreaths, garland can be used to decorate packages or pine needs used to protect flowerbeds or garden during the cold months.

Tuesday, December 11, 2012

Purging before the New Year

The New Year means a clean slate to me; a chance to create memories for the upcoming year; a fresh start and room to breathe and be. It is a chance to let go of all the baggage and 'stuff' we've been carrying around that we no longer need.

And of course, the New Year comes directly after a month of receiving new gifts and pulling out once-a-year items for limited use. Now, I don't want to start cleaning the slate on New Year's Day. I want it already clean, organized and ready to go when we let go of the old year and welcome in the new one.

Which means... the time between Thanksgiving and New Year's is when I make the time for cleaning, organization, repairing, donating and purging. Impossible, during the holidays? I say no, if you break it down into smaller tasks and do a "clean as you go" sort of approach.

Some tips:
  • Make a list of goals to accomplish. Be clear. Be realistic. Estimate the supplies needed and the amount of time it should take. Schedule them as you can. Also, make sure to schedule relaxation time to counter all this uberproductivity.
  • I use Remember The Milk to schedule in bursts of cleaning/purging amidst all the holiday stuff, even if it is 7 consecutive days of 60 minute cleaning sessions out in the garage. RTM also has handy apps to track your tasks and to-do lists on the go. I'd rather do small projects for 45-60 minutes each day for a few weeks than to set aside a week of hard core cleaning at the end.
  • Got a spare evening while you are watching holiday movies? Pull out your makeup bags and sort through it. Purge anything outdated or expired. Then set up an automatic calendar reminder to do it again in 6 months.
  • Pinterest is a good resource for cute, DIY organization ideas.
  • Now is a good time to donate anything from toys to coats to food to used furniture. If you aren't using it, haven't used it in the last two years and you know it is still good and serviceable, consider calling a local charity to donate. Save your receipt if you need it for filing taxes.
  • If you have clothing or items set aside for repair.... now is the time to either get them repaired or call it quits. *Especially* if they've been out of commission longer than 6 months.
  • Check when your local trash service picks up bulk items, and schedule accordingly.
  • If I bring gifts for others into the home, I mark them off my gift list, store the receipts, wrap as soon as possible and get them to their owners if they are being mailed out and gifted. There is no need for them to sit in the house any longer than necessary. 
  • In the same spirit- make room for new gifts and put them away in their designated space. If you need to make room on a bookshelf for new books, find a few you will not read again and take them to a half price bookstore or donate them (or give to a friend who you think will enjoy them). If you receive new clothes, check to see if there's any existing clothes in your closet you no longer wear or have outgrown to make the room for the new items.
  • Purge through holiday ornaments/trinkets/knick knacks as you pull them out to decorate. Check them over for any damage to be repaired or assessed for purging. Get rid of any items you don't like/don't want/don't use... even if you are holding onto it for sentimental reasons, ask yourself how important it is to you in the long run, given the current condition it is in. Only you can make that call, but it's common for people to hang on to "stuff" they'll never use out of sheer habit alone.
  • Label your storage boxes for holiday gear. Take the time to wrap up the ornaments and knickknacks when you are done, and wind the lights with care. I tend to stock up on new wrapping paper, gift boxes/labels/ribbons, decor, cards and ornaments on Dec. 26th when they are on clearance, and will list everything out on the label when packing up seasonal items. I also tuck new scotch tape and extra scissors in with all of the wrapping gear so I don't have to scrounge around looking for it next year. 
  • I try to have the decorations down and in their place by New Year's Eve- the first weekend of January if absolutely necessary. Once I'm done with the holiday, I'm ready to move on.
  • When you receive greeting cards, verify the address to make sure you have the most recent location in your records. Track who you receive cards from, and who you are mailing ones to.
  • If you need to, farm out the heavier cleaning or tasks. If you only splurge once a year on a cleaning service, this may be your time to do so without guilt. The holidays can be the most stressful times of year, particularly with guests and additional entertaining and it may be worth it to remove extra stress. Look for local groupons for discounts, or ask friends for recommendations for cleaning services. Decide if you want to handle the basic cleaning, and ask them to do the heavier once-or-twice a year chores, or if you want them to come in and handle everything for you.
  • I try to air out the house as best as possible when I'm doing that end of year cleaning.. that will depend on your climate but if it's possible to do so, I find it helps.
Good luck!

Monday, December 10, 2012

A little Latke here, a little Sufganiyot there...

Most of the holiday memories I have revolve around traditions of some kind, and many of those involve  traditional family handed down recipes.  Hanukkah is no exception to this rule.  From as far back as I can recall Hanukkah was celebrated in our family with both potato latkes and Sufganiyot (Israeli jelly donuts).  So for me it wouldn't be a complete and happy holiday without these things.  Now I proudly teach my daughters how to make both of these.  From my family to yours, Happy Hanukkah.

Bubbie Leah's potato latke Recipe

Ingredients:
6 potatoes peeled and shredded
1 sweet onion diced finely
2 eggs (lightly beaten)
1 cup all purpose flour

salt & pepper to taste

oil (we prefer to use canola oil for this but any oil would work)


Directions:

Soak your potatoes in cheese cloth to be able to ring out excess moisture for about 1 hour.  Remove the potatoes from the excess moisture and combine in a bowl with the diced onion.  Mix in the 2 eggs (lightly beaten).  Mix well.  Salt & Pepper (start with about a pinch of both).  Slowly add flour 1 tablespoon at a time until your potato mixture is binding together.  Use as much flour or as little flour as necessary to bind your potatoes together.

Heat your oil in your frying pan (I usually use an electric frying pan but you can use any fry pan that you prefer).  When your oil is sufficiently hot, drop potato mixture by rounded tablespoon into your oil.  Let fry on one side until the side is golden brown.  Then flip and fry on the other side for the same length of time.  Take out of the fry pan and let cool slightly on some paper-towels (they help absorb any excess oil).

We like to serve them with either apple sauce or sour cream.

Bubbie Faye's Sufganiyot Recipe

INGREDIENTS:
2 cups all-purpose flour, plus more for dusting the baking sheet and rolling out the dough

1/4 cup granulated sugar
1 (1/4-ounce) packet active dry yeast (2 1/4 teaspoons)
1/2 teaspoon fine salt
2 large egg yolks
3/4 cup warm whole milk (105°F to 115°F)
2 tablespoons unsalted butter (1/4 stick), at room temperature
6 cups (1 1/2 quarts) vegetable or canola oil, for frying, plus more for coating the bowl

2/3 cup smooth jam or jellyPowdered sugar, for dusting


Directions:

Place the flour, sugar, yeast, and salt in the bowl of a stand mixer and whisk to combine. Add the yolks and milk and mix, using the hook attachment, on medium-low speed until a shaggy dough forms, about 1 minute. Add the butter, increase the speed to medium high, and mix until the dough is smooth, shiny, and elastic, about 5 minutes.

Coat a large bowl with oil. Form the dough into a ball, place in the bowl, and turn to coat in the oil.

Cover with plastic wrap or a damp towel and let rise in a warm place until doubled in size, about 1 to 1 1/2 hours.

Lightly flour a baking sheet; set aside. Punch down the dough, transfer to a lightly floured work surface, and roll until about 1/4 inch thick. Using a 2-inch round cutter, stamp out as many dough rounds as possible and place on the prepared baking sheet about 1/2 inch apart. Gather the dough scraps into a ball and roll out again, stamping rounds until you have 30 total on the baking sheet. Cover loosely with plastic wrap or a damp towel.

Let rise in a warm place until puffy and about 1/2 inch thick, about 30 minutes.

Place the vegetable or canola oil in a Dutch oven or a large, heavy-bottomed pot and set over medium heat until the temperature reaches 350°F on a candy/fat thermometer. Meanwhile, line a second baking sheet with paper towels and place a wire rack over the paper towels; set aside.

Place the jam or jelly in a piping bag fitted with a 1/4-inch round tip; set aside.Using a flat spatula (don’t use your hands—this will deflate the doughnuts), carefully transfer the dough rounds, one at a time, into the oil. You should be able to fit about 6 at a time, leaving at least 1 inch of space in between and keeping the oil temperature at 350°F. Fry until the bottoms are golden brown, about 1 1/2 minutes. Carefully flip with a fork and fry until the second side is golden brown, about 1 1/2 minutes more. (If air bubbles appear in the doughnuts, pierce with the tip of a paring knife.) Remove with a slotted spoon to the wire rack. Repeat with the remaining dough rounds.

When the doughnuts are cool enough to handle, use a paring knife to puncture the side of each to form a pocket in the center. Place the tip of the piping bag into the pocket and pipe about 1 teaspoon of jam or jelly inside. Dust with powdered sugar before serving.

Sunday, December 9, 2012

Wreath Making


I was invited by a co-worker to a Holiday Wreath making class.  Why not?   I am not the craftiest person, but I'm not completely hopeless!

Supplies

1 Wreath Form with decorative twists (available at www.mardigrasoutlet.com)
10 yards of 21" deco mesh ribbon
10 yards of ribbon in a smaller width (mine was about 5")
10 yards of ribbon in a smaller wideth (mine was about 2")
Decorations that can be tied or hot glued on (I used jingle bells)
Scissors, Wire, Hot Glue


The basic idea is that you tie the ribbons down with the "twist ties" that are on the wreath form and weave in and out, alternating between the inner loop and the outer loop.  Each layer of ribbon gets twisted in on top, and you can make loops, or bows or be as creative as you want.


Since explaining this without a video would be hard, here is a video I found on YouTube:


My green base ribbon "poufs" are about 9 inches. I wove in and out between the inner loop and out loop all the way around, but here is another alternative:


The difference in mine is that my second and third ribbons weave around the outside, skipping every other set of ties and at the top I made some poufy bows by doubling up the ribbon. I fastened the jingle bells on with floral wire (at 4 points, not sure if it can be seen here), but you can do a lot of different things.

There are lots of different options out there for ribbon, and there is even mesh roping that can be used, all that matters is the base is 21" wide and the ribbons get smaller as you build up.  Since you are using the same "twist ties" to tie each successive layer in, you might not be able to do more than 3-4 layers of ribbon, especially if you tie them in tightly.

There are tons of other videos with ideas out there, just search for "deco mesh wreath"  there is a pretty  cool looking Halloween one that I might just have to make!

Saturday, December 8, 2012

Tips for Staying on Budget the Holidays

Holiday spending can put you in debt for the rest of the new year. Create a budget that is affordable to your bank account.  The best thing is to be putting away for it all year and then staying on budget with the money you have saved. If you don't save all year, still stay within a budget so that you aren't creating more stress for you in the new year ahead. So the most important thing to do is stay on budget

Here is some tips to help you stay on budget for the Holidays...


1. Make a List - Make a list of those you need to give too with ideas of what you want to buy/make.


2. Trim Your Gift List - It is time to look at the list and make sure you aren't stressing yourself out in the long term by adding more debt. 


3. Make Gifts - with Pinterest you can find so many great ideas for handmade gifts. 


4. Online - If you really need to get something that you feel is out of your budget and you can't think of anything else to give to that person, buy it online. So you really want to give Aunt Alice that $200 scarf look online as you most likely will find it for less. Find places that have free shipping or direct shipping of gifts to your recipients so that you save money on mailing. Use places like Retailmenot.com to help find coupons and free shipping codes.


5. Been Shopping Already - I buy things throughout the year to give as gifts. I have them all put in a plastic crate in the closet, but sometimes I forget about the things I have bought. So make sure you look around your house before you do any shopping to see what you can mark off your list. 


6. Thrift Store- It has to be the right gift: collectibles, vintage items, books or new items. I have found very pretty things that are just perfect for the right person. 


7. Family Gifts - It helps cuts your gift list down by purchasing one gift instead of 4. Such as if you have a your whole brother's family why not just do a family gift instead of 6 gifts for every person in the family. Good family gifts are board games, a classic movie on dvd and a box of microwave popcorn, a popcorn popper with some popcorn and popcorn seasoning (that is good to make at home too), tickets to a play or movies, family memberships to the zoo or a museum, a box of fruit, a basket of different hot cocoas and teas or a basket of hot cocoa (make it homemade) with different add-ins homemade marshmallows, caramel syrup, red-hots or peppermint sticks, or candied ginger. 


8.Co-workers - Do you have to give to all your co-workers? Why not just bring in food. Bring in breakfast - make an egg casserole or muffins and fruit salad for something different during the holidays. 


9.Friends - Get all your friends together for brunch or lunch. The get together is your gift to each other. One year all of a group of friends and I got together to go to the local museum and then to lunch and that was our gift to each other - quality time together during the holidays. It was much needed during the stress of the season so was a great gifts to have fun and laugh with my favorite girlfriends.


10. Gift Exchange - Doing a Gift Exchange can help you cut down on expenses during the year and keep on budget. Pick names, rotate names with your family. One year have Aunt Sue and then the next your brother-in-law or do a secret santa. If you are only buying for cousin Joe instead of 13 family members that is going to cut your holiday shopping list down. 


11. For Others - Sometimes finding a great deal can make it hard to do not want to buy one for yourself, but if you do that then you will go over your budget. Stick to buying for those on your list and remind yourself that you are not on that list. If you really want to take part of some of the holiday deals, make sure you put a certain dollar amount into your budget for spending on yourself. 


Here is a Holiday Gift Planning List to download and use in your making sure you stay within your budget.


Friday, December 7, 2012

Friday Favorites


Printable Cookie Exchange Party Kit - looks like she has options to buy invitations, but the banner and toppers and such are free
Homemade Gingerbread Play-dough - be a cute and fun gift for kids on your list
Cinnamon Applesauce Ornaments - they smell good and just have that cozy homemade feeling that makes things feel a little more magical this time of year. Great on the tree, but also for decorating packages.
Holiday Peppermint Chex - or also known as Reindeer Food
Free Printable Wine Bottle Gift Tags - they are bright and cheery....print, cut out and slip on a bottle to give as a gift

Thursday, December 6, 2012

Making the Most of Citrus Peels

Master enjoys oranges and lots of 'em when they're in season.  Several years ago, I started looking for ways to use those peels and get the biggest bang for His buck.  That citrus peel really is some versatile stuff.  Being as citrus season is in full swing, I thought I'd share some of my favorite ways to put all that zest to use:

  • Candied Citrus Peel - I've used every type of citrus for this and they've all been wonderful - lemons, oranges, and clementines are favorites around here.
  • Cut the pith from the zest, so you just have the colored part not the white part and cover with vodka.  Allow the zest to infuse with the vodka for two weeks to a month, strain and add a sugar syrup to taste to the strained liquid.  The resulting citrus liqueur is yummy in hot drinks and cold alike.
  • Dry the zest and make a scouring powder.  Again, any old citrus peel would work, here.
  • Put the peels in a jar and cover with vinegar.  Allow the zest to infuse in the vinegar for 2 weeks and strain.  Use the vinegar to clean as you would normally but it'll have a more pleasant citrus scent instead of regular vinegar.
  • Combine the zest with sugar or salt to make a body scrub.
  • Mix the zest with some sugar and let it sit for about a month.  The sugar will take on the flavor of the zest and is perfect for dusting cookies, adding to tea, etc.
Do tell us, please, what are your favorite ways to use up those citrus peels? 

Wednesday, December 5, 2012

Gearing Up for Holiday Baking


Right before I start my holiday baking, I pull all the recipes together. If they are in a cookbook, I scan the page in and print it off so that I can clip them all together and get through each recipe without having to search for them. I keep them from year to year so that I am not reprinting anything but new recipes I am trying that year.

After pulling all the recipes together, I go through and write down the ingredients. Making note of how many sticks of butter, how much milk/cream or how many eggs so I can keep a general count of it when making my shopping list.  

Here is a general list of baking supplies (ingredients and gear) that I keep handy around the holidays. There are of course some other things that I end up needing for a few recipes such as: wheat flour, peppermint extract, cream cheese and so on.  This is just a list of the basic list of ingredients and gear to help you get started in gathering your supplies.

INGREDIENTS
* all purpose flour
* baking  powder
* baking soda
* butter
* brown sugar, confectioners’ sugar, and granulated sugar.
* pure vanilla extract
* eggs
* milk or half-n-half
* sweetened condensed milk
* chocolate – bittersweet as well as semi sweet and milk chips, baking squares, cocoa powder
* nuts – pecans and walnuts
* spices – cinnamon, nutmeg, cloves, ginger

BAKING GEAR
* mixer – hand or stand mixer
* mixing bowls
* measuring cups and spoons – more than one set during the holidays is always nice when baking
* rubber spatulas  - to scrap bowls
*plastic or metal turners – to lift cookies off baking sheets and on to cooling racks
* pastry bush
* rolling pin
* cutting board – to roll out cookies
* cookie cutters
* pans – muffin pans for cupcakes, baking sheets – both rimmed and rimless sheets, cake and loaf pans – regular size and mini
* cooling racks
* parchment and wax paper
* cupcake liners and candy wrappers
* tins and containers to store baked goods

Printable PDF of Baking Supply List

Remember during the holiday some gift-recipients or guests might have food allergies or are just trying not indulge in all the sweet treats being offered.  Substituting healthier ingredients and trying to do some recipes that fit a special diet are always a nice idea. When I am sending a goodie tray to someone for the holidays, I like to list each sweet treat and their ingredients so that people know exactly what they are eating.   

LinkWithin

Related Posts Widget for Blogs by LinkWithin