Saturday, May 28, 2011

Pasta Salad


We went on a picnic a few weeks ago at one of the many beautiful waterfalls here in Colorado. And I didn't want to just pack the usual sandwiches so I suggested pasta salad and that sounded like a good idea to everyone. I wanted to make something that I had all the ingredients on hand so this is what I came up with it. It is easy and good for summer dinner. Serve with some crusty bread.

I would say this serves about 6. This would be easy to double to make for a crowd also.


Ingredients
8 oz. uncooked pasta (I used small shells)
1 cup cooked cubed boneless chicken breast (I used 1 large breast)
3/4 cup cubed cheddar cheese
1/2 cup peas
1/2 cup carrot - shredded or julienned (either work and taste good)
1 1/2 cups Ranch dressing*

Directions
Cook the pasta until done to desired tenderness and drain well. Cool completely. Toss with chicken, cheese, peas, carrots and dressing. Chill for an hour before serving.

*Ingredient Tips
* Start with 1 cup of Ranch dressing and then taste and keep going until you are happy with the consistency and taste. Also if you let it set over night sometimes the dressing can soak in so might need to add more the next day if you have left overs. I wouldn't make this salad the day before - unless just prepping all the ingredients and then tossing together an hour or 2 before serving.

* I used frozen peas and just ran a little water over the peas to thaw them.

* Left over chicken would be good for this - I used left over grilled chicken.

Friday, May 27, 2011

Friday Favorites


32 Organizing Tip Links from Tip Junkie

The Ultimate Burger with Roasted Tomatoes, Caramelized Onions and Smokey Chipotle Ketchup - just looks incredible - no wonder it is called the Ultimate Burger

25 Uses for Coffee Filters - I saved this to share here and then it was shared on the FetLife group recently too.

Making Tiered Trays - With all the cute summer plates out I think this would be easy to make and look cute with the industrial looking bolt.

Paint Chip Decorating Tip - tip for keeping your room colors handy

Tuesday, May 17, 2011

DIY

This idea is great if you have old chairs that you want to spruce up, or you can purchase a chair pretty cheaply at antique stores or flea markets. In my case, I needed a chair for my sewing table and wanted something pretty and decorative too.

Choose a chair with a good solid structure and whose seat you can remove and recover. The one I chose is an old dining room or kitchen chair.

Photobucket

Items needed:

1 old chair
Sand paper
Paint and pain supplies
Fabric (enough to recover the seat)
Staple Gun
* You may want to enhance the padding on the seat as well with foam batting

First, remove the cushion from the chair. Using sandpaper, sand as much of the old paint/varnish off the chair. Start off with a heavier grit of sandpaper and finish with a fine grain to make it as smooth as possible. I also removed the medallion on the back of the chair since it was damaged.

Photobucket

Prepare your paint. I wanted something bright and cheerful and LIME GREEN.

Photobucket

It may take a few coats, here's my chair after the first and last coats.

Photobucket

Photobucket


Make sure paint dries thoroughly between coats, before starting additional coats sand off any drips. Let dry completely after last coat before re-installing the seat.

Now it's time to cover the chair. Trim the fabric so there is a 1 1/2 - 2" overlap on each side. Place the fabric right side down on a table and center the cushion over it. If necessary, add the foam batting. Wrap fabric around and staple, making sure to pull tight and that the corners lie flat. If there are screw holds to hold the cushion to the chair, make sure they remain unobscured.

Photobucket

I have to admit at this point when I originally covered the chair it didn't dawn on me to take pictures of the seat reversed to show how to do the fabric. It was many years ago before I was invited to blog here. I think I took pictures to amuse a friend of mine.

Once chair is dry and cushion is covered, it's time to bring them back together!


Tada!

Photobucket

So this is where I sit when I work on my sewing projects. I'm not confident enough yet in my skills to share how to do anything but mend a seam or make a hemline or sew replacement buttons

Monday, May 16, 2011

Whole Wheat Waffles

Master has a thing for waffles. It's his breakfast of choice, choosing to eat that about 5 mornings out of 7. For awhile I was making them with a standard waffle mix (Aunt Jemima or some such something), but then I got all caught up in the white-flour-is-teh-debil! craze that swept the nutritional world and started buying frozen Kashi whole-grain waffles.

Because I need to keep him as healthy as possible, you see. I'm totally not done with him yet!

Master was not a big fan of Kashi, evidenced by referring to them as "that cardboard shit you're feeding me for breakfast". And though I may have told him to "suck it up, buttercup", the outrageous price of frozen Kashi whole grain waffles offended my cheap-skate sensibilities.

There were 8 in the package, for somewhere between 3 and 4 dollars a box. And because they're small (standard size for frozen waffles, but at 6'4" and 220lbs, Master is not a standard size guy.) he'd eat two waffles a serving, so, 4 servings a box.

I went on a mission, not only to find something cheaper and just as healthy, but to also, hopefully, move out of the cardboard category.

I'm pleased to share the following recipe:

Whole Wheat Waffles

Ingredients

1-3/4 cup whole wheat flour
1/2 tsp of salt
1 tbsp baking powder
2 egg yolks
2 egg whites
1-3/4 cup skim milk
1/2 cup unsweetened applesauce
3 tsp Sugar (or Splenda, if that's your thing)
1 tsp vanilla extract
Optional: a bunch of cinnamon, or whatever else you like

Directions
In a large mixing bowl stir flour, baking powder, sugar and salt.

In a small mixing bowl beat egg yolks, milk, vanilla and applesauce (and cinnamon, if using). Add to the flour mixture all at once. Stir mixture until blended.

In small mixer bowl beat egg whites until stiff peaks form. Gently fold beaten egg whites into original mixture and do not over mix.

(I have no idea why the recipe calls for beating the egg whites separately, but we are not to question such things! Just do as you're told, like the good little submissive you are.... :P)


Pour batter onto preheated waffle maker which has been sprayed with non-fat cooking spray. Cook according to your waffle maker's directions.

The recipe site I got this from listed this as 5 servings with a calorie count of 216 per serving.

Well! I beg to differ!

I got 13 waffles out of this recipe, and a single waffle for us is a serving. I mean, jeez, they're huge!


So my new estimated calorie count for these is right around 100 calories, plus whatever your topping of choice is.

(The recipe analyzer also said there was alcohol in the recipe and damn if I can figure that out. Though I do cook with wine, and I sometimes even add it to the food, I most certainly did not add any to the waffles!)

I couldn't even begin to break down the cost savings as I had quite a few of the ingredients on hand. The only thing I had to buy was the bag of flour and a jar of applesauce, which totaled less than a single box of Kashi, and I'll get who-knows-how-many batches out of them.

I flash froze the waffles, stacked them separated with flattened out coffee filters because I was out of any other non-sticky food separator stuff, popped them in a freezer bag and called it Domestic Service.

To serve, I cut them in half, pop them in the toaster and voilĂ ! Healthy(-er than white flour) and cheap(-er than Kashi) whole wheat waffles, that, best of all, have been declared "better than cardboard!"

Ah. Sweet success!

Friday, May 13, 2011

Friday Favorites

Make Your Own Daily Shower Spray

Real Simple's New Uses for Things in Your Office - some of these things are very impractical to me but some are creative and could be very useful.


Garage Sale How To from Ready Made - With garage sale time here this might have some useful tips for those wanting to do a garage sale


SixThreeFive sent me the next 2 links to share...
Scandi Foodie - the photos alone on this site are amazing. Make me hungry!

Princess Cake - "It is a sponge cake that has a cream filling and the layers are brushed with a simple syrup and raspberry jam. The cake is frosted with whipped cream and then a light green marzipan topping is rolled and stretched over the entire cake."

Thursday, May 12, 2011

Quick Mops vs Standard Mops

Here's an interesting article comparing the costs of various mopping options.

Personally, I love the ease and convenience of the Swiffer wetjet, but I don't love the cost of buying disposable pads or new bottles of cleaning solution. Since I mop almost every day, it'd cost me a fortune to stay stocked in pads and solution.

So, I simply refill the bottle myself (Instructions here and here) with a mixture of vinegar, water and rubbing alcohol (so it dries faster) and use reusable, washable pads. I have a couple of pads that a friend crocheted for it, and if those are dirty, then I fold up a microfiber cloth and use that. It sticks to the velcro on the Wetjet just fine.

I don't like using an old fashioned sponge mop because they can't be cleaned and that bugs me. Besides, most of our floors are laminate and sponge mops are just too wet for laminate flooring.

According to the article, the Swiffer Wetjet is the cheapest of the quick mops to purchase, but more expensive eventually because of the price of the refill pads and solution bottles. Other quick mops that include reusable pads and refillable bottles are more expensive to purchase but cheaper in the long run.

I figure because I made my cheaper-to-purchase Swiffer into a cheaper-to-maintain resuable/refillable quick mop, I'm coming out ahead of the game!

Ultimately, an old-fashioned mop and bucket is going to be the cheapest route. But for me, sometimes spending a little bit more for peace of mind in cleanliness is the better choice. :-)

Sunday, May 8, 2011

Easy Wall Decor - Wooden Tiles

I got this idea from a magazine several years ago, I wish I could find the article but 2 hours worth of searching has not gotten me anywhere. You can modify to your heart's desire to match your decor. It just so happens that the original color scheme from the magazine fits my bedroom colors (cream and brown with touches of teal). Also, you can modify the number of tiles. I know I cut it down from the original number.


Supplies

9 Wooden Tiles, 7 1/4" x 8" x 1" (cut from 1x8 inch board.. apparently 1x8s are only about 7 1/4 inches wide)
Brown acrylic paint
Black acrylic paint
Medium sized paint brushes
Gold Leafing
Gold Metallic Lettering Pen
Gold Stencil Paint and stencil brush/paint dauber
2-3 Stencils that will fit on cut boards
Wall Paper Samples Book*

*Discontinued wall paper samples books can be obtained by visiting shops that sell wall paper and asking if they are willing to sell any or purchase off eBay.

Sand all edges smooth.

Paint two tiles black and let them dry. Paint 2-3 other tiles in brown and let them dry.

Go through the wall paper book and select 5-6 patters and remove from the books. Cut to fit the tiles, so that they wrap around the tiles and overlap on the backside of the board. Use a heavy-duty stapler to secure.


For the brown tiles, chooses stencils and apply with gold stencil paint. Let dry. When dry, use a paper towel and light brush edges with a small amount of gold paint to give it an "antiqued" look.


Take one black tile and apply gold leafing to the entire surface. Follow instructions on the package.


Using the metallic pen, choose a poem or piece of prose and write in very loose, almost sloppy handwriting. My hint on this is don't start from the beginning, pick a section that speaks to you and write until you can't fit anymore on. Mine is from Elizabeth Barrett Browning's "Sonnets from the Portuguese".


To hang, determine the arrangement and apply fasteners. I used 3M's Picture Hangers (I think that is what they are called), they are two pieces with velcro and easy to remove tabs should you need to take them down.


I apologize for the picture quality in some shots. I didn't want to take them all off the wall because putting the back up (for me) is difficult and getting the 2 I took down back up took longer than I wanted due to the fact that I am extremely OCD and getting them straight drove me crazy. So I stood on tip toe to get most of them!!

As you can see I chose to do 2 stencils, and 5 wall paper, the book I chose had a lot of selections that I thought worked well and I didn't trust my painting/stenciling skills very well. The gold leafing was not as hard as I thought it would be, although the hardest part of that for me was making sure that the leaves did not stick to itself while I was laying them down.

Thursday, May 5, 2011

Gooey Chocolate Muffins

On Wednesday I had an interview for a job I've really, really wanted and in the afternoon, the phone rang with the news that I got it! So to celebrate, I made gooey chocolate muffins, filled them with raspberry topping and had a glass of cider with that.


Here is the recipe for the muffins, unfortunately it doesn't translate well into cups and oz, so you'll have to do with the metric version. Makes about 12 muffins:

100 g butter
2 eggs
2 1/2 dl sugar

1 1/2 tsp vanillasugar (if you haven't got any, ignore it or put some vanillabean in casters sugar over night and use that)

4 tbs cocoa powder

2 dl wheat flour, all-purpose

1/2 tsp baking powder

Melt the butter and stand aside. Set the oven for 200C. Whip egg and sugar till white, then add the dry ingredients. Stirr well, then stirr in the cooled butter. Fill the forms about halfway and put in the middle of the oven for 10 minutes. They shouldn't be cooked through, that's what'll make them gooey!

Then take them out and put them in the fridge. Mix ½ a pack (100g) of Philadelphia cream cheese and powdered sugar untill you get a soft, slightly fluffy paste. I think I had like 2dl of powdered sugar, but taste as you go along! Then mix in 1dl of thawed raspberries. Scoop into the muffins, which should have sunk in and formed small caves. Serve fridge-cold, with spoons.

The white ones on the picture are without raspberries and with vanillaessence, but they weren't half as good as the raspberry ones!

Tuesday, May 3, 2011

Car Trash Can

I thought this was a clever little tip....
Taking a plastic cereal dispenser and converting it into a trash can for your car.


Photo from BHG.com

Monday, May 2, 2011

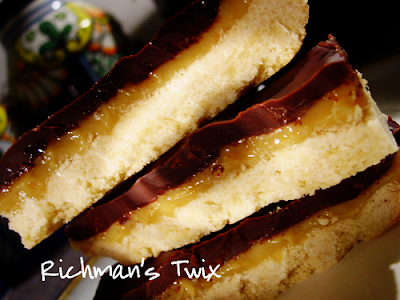
Twix Candy Bar

This recipe is from the cookbook Baked:New Frontiers in Baking by Matt Lewis and these bars are the only thing I have tried but all the photos in this book make me want to try everything. I have checked this book out from the library and I going to admit this out loud or I guess more like in black and white print....I loved the look of this cookbook. It was the typography, the graphics, the styling just made me want to pick it up and dive into baking! But I know I won't touch some of the recipes because they are just going to take too much time for me. I am not a patient baker. I love to bake but I am not patient. And some of these recipes (including this one I am about to tell you about) include patience. And although I am sure the recipes in Baked:New Frontiers in Baking are worth the patience - I just am not sure I am the woman up for the job of testing that out. But I did for this recipe and the bars in the end were worth the effort. OH MY!

These are not bars you can just easily whip up in 30 minutes to an hour. This requires a whole afternoon. They are time consuming and messy to make. As I said I wasn't sure they were going to be worth all the effort but these bars are HEAVEN! Probably the best bars I have had in a very long time. If you are wanting rave reviews, have the time and don't care to make a mess - take the time to create these.

And I suspect that many of the recipes from the cookbook would end up this way - with rave reviews and worth the time and effort.

In the book they called them the Richman's Twix - Millionaire's Shortbread and that is what they tasted liked - an upscale Twix candy bar.


for the Shortbread
1/2 cup sugar
1 1/4 cups (2 1/2 sticks) unsalted butter, softened
2 1/2 cups all-purpose flour
1 large egg yolk, slightly beaten

for the Caramel Filling
28 ounces sweetened condensed milk (two 14-ounce cans)

for the Chocolate Glaze
6 ounces dark chocolate, coarsely chopped
1 teaspoon light corn syrup
1/2 cup (1 stick) unsalted butter, softened, cut into cubes

for the shortbread:
Preheat the oven to 350°F. butter the bottom and sides of a 9-by-13-inch baking pan.

In the bowl of an electric mixer fitted with the paddle attachment, beat the sugar and butter together until blended.

Add 2 cups of the flour and beat until well combined. Add the egg yolk and beat for a few seconds, or until just combined.

Turn the dough out onto a lightly floured work surface. Dust the top of the dough and your hands with a little flour. Use your hands to gently work the dough into a 6-by-6-inch square. You will have to turn the dough and sprinkle the top with flour as you go. Sprinkle the remaining 1/2 cup flour on the surface of the dough. Fold the dough over and knead until incorporated, then flatten the dough into a rectangle. Transfer the rectangle to the prepared pan and press it into the pan.

Prick the dough all over with a fork and bake in the center of the oven for 20 to 22 minutes, until golden brown. Transfer to a wire rack and let cool completely.

for the caramel filling:
Stove top Method: Put the sweetened condensed milk in a medium heatproof bowl and set it over a saucepan of boiling water over low heat. Cook for 1 to 2 hours, until thick and caramel colored. Remove the bowl from the pan and beat until smooth.

Microwave Method: Put the sweetened condensed milk in a large microwave safe bowl. Cook at 50 percent power (medium) for 4 minutes, stirring briskly halfway through, until smooth. Cook on 30 percent power (medium-low) for 12 to 18 minutes, until very thick and caramel colored, stirring briskly every 2 minutes, until smooth.

Pour the caramel filling over the cooled shortbread and place the pan in the refrigerator until cooled, about 2 hours.

for the chocolate glaze:
In a large nonreactive metal bowl, combine the chocolate, corn syrup, and butter. Set the bowl over a saucepan of simmering water and cook, stirring with a rubber spatula, until the mixture is completely smooth. Remove the bowl from the pan and stir for 30 seconds to cool slightly. Pour the mixture over the chilled caramel layer and use an offset spatula to spread it into an even layer.

Put in the refrigerator for 1 hour, or until the glaze hardens.

Remove the pan from the refrigerator 30 minutes before serving so as not to crack the chocolate glaze. Cut into squares and serve.

The bars can be stored in the refrigerator, tightly covered, for up to 4 days.

NOTES:
- made caramel via microwave method and much like when I make my maple fudge recipe - it boils up and over the bowl - so be prepared for a mess in the microwave
- I would add 1 tsp vanilla to caramel next time after it comes out of the microwave
- I added just a bit more chocolate as I used dark chocolate chips instead and had a little left in my bag and didn't want to put them back in my cupboard so used the rest so my chocolate is a little thicker then pictured in the book
- I just melted the chocolate mixture in the microwave instead of on the stove top and it worked fine


LinkWithin

Related Posts Widget for Blogs by LinkWithin