Wednesday, July 30, 2008

Pizza

Written in February 2008:

This week I got around to making pizza on the stone and it was fantastic! It makes me think about making pizza every week but I am sure we would get sick of it....or would we? I top our pizza Chicago style even though the dough is a thinner crust instead of a thick crust like most Chicago style pizza's. I made 2 pizzas one veggie and the other with meat. It was nice to eat left over pizza for lunch.


Whole Wheat Herb Pizza Dough
1 1/2 cups water
2 tablespoons olive oil
2 cups all-purpose flour
2 cups whole wheat flour
1 teaspoon sugar
1 teaspoon salt
2 teaspoons basil
2 teaspoons oregano
1/2 teaspoon garlic powder
2 1/2 teaspoons yeast

Place all ingredients in the bread machine in order used by machine. Run on dough cycle.

Removing the dough from the machine form the dough into a ball and place into a bowl sprayed with cooking spray. Cover loosely with plastic wrap coated lightly with cooking spray or a dish towel and place in the refrigerator for 2 hours to overnight rise.

Remove the bowl from the refrigerator about one hour prior to making the pizza. Set the bottom oven rack to its lowest position and preheat the oven to 400° F for at least 30 minutes before baking. Tip the dough out onto a lightly floured surface, and divide into 2 balls of dough for 2 smaller/thinner crust or leave whole to make one large/thick crust. Roll a ball of dough with a rolling pin. Since this is whole wheat it sometimes wants to snap back instead of rolling out. Let it rest for a bit and then try it again. Drape it over both of your fists, and gently pull the edges outward while rotating the crust. When the circle has reached the desired size place on pan or pizza stone and add desired toppings.

From crust up I layer: cheese usually a combination of mozzarella, ramono and parmesan cheese, then meats and veggies, crushed tomatoes, herbs and a light sprinkle of cheese again.

Here is a good link about Pizza Stone's since I had never used one I thought I better read up on them.

Monday, July 28, 2008

Book: Natural Cleaning for Your Home

Natural Cleaning for Your Home: 95 Pure and Simple Recipes by Casey Kellar

I think the book is put together nicely with photographs and recipes for natural cleaning. But I was mostly disappointed with the natural cleaning recipes the author offered. There were some good alternatives to using store bought harmful chemicals, but she used some harsh chemicals to me and not a natural cleaning supply. Again good alternatives to Fantastik, Windex or the likes. But ammonia and bleach aren't natural and are harmful chemicals. The author's alternatives to what we can get in the supermarket would be considerably cheaper though even with ammonia or bleach being used in some recipes.

Other things I didn't like : there weren't enough recipes, she used things that really aren't easy to come by in a smaller town and some of the instructions weren't clear or as descriptive in use as I would have liked.

The book did give me some recipes that I hadn't heard of before and want to try. So it was worth checking out from the library just not owning.

Wednesday, July 23, 2008

Cleaning the Microwave

After food has splattered in the microwave, it can be hard to clean up. Just heat 1/4 cup of vinegar with 1 cup of water in a cup or bowl in the microwave. This will loosen splattered on food and deodorize. I let it sit for about 3 to 5 minutes letting the steam loosen the splatters but also allows for the water to cool down. I then take the vinegar/water mixture and moisten a rag or sponge to wipe the inside down.

Also if you have had burnt popcorn smell in the microwave doing, microwaving the same mixture will remove the odor.

Tuesday, July 22, 2008

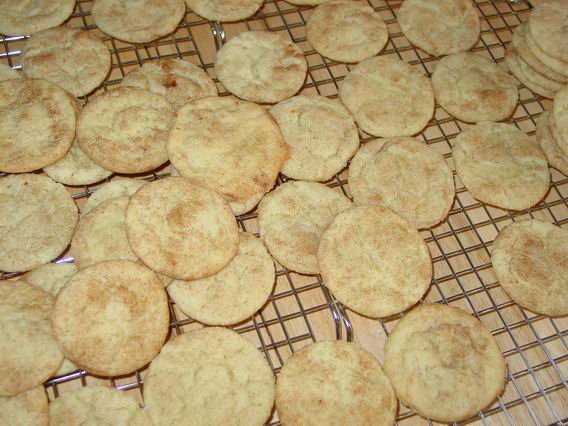
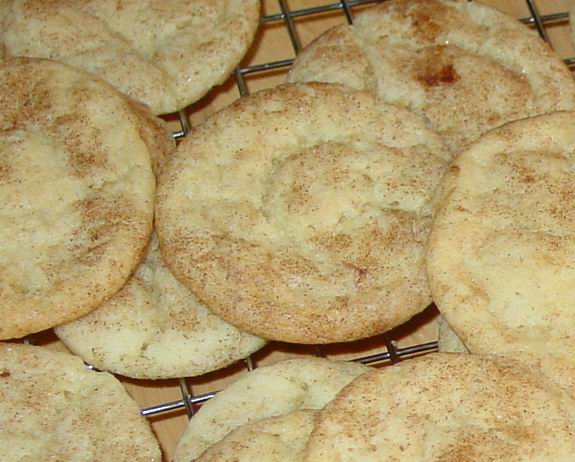
Snickerdoodles


The recipe:
2 sticks butter
1 1/2 c. sugar
2 eggs
2 3/4 c. all-purpose flour
2 tsp. cream of tartar
1 tsp. baking soda
1/4 tsp. salt
2 tbsp. sugar
2 tsp. cinnamon

In a large mixing bowl cream at medium speed butter, sugar and eggs until light and fluffy. Scraping sides of bowl occasionally. In a separate bowl, combine flour, cream of tartar, baking soda and salt. Add to creamed mixture until well blended. Refrigerate dough 30 minutes.

Preheat oven to 375 degrees.

Combine the sugar and cinnamon. form dough into balls (walnut sized) and roll in sugar-cinnamon mixture. Place 2" apart on baking sheet. Bake about 10 to 12 minutes or until golden brown. Remove and cool on rack. Snickerdoodles will puff up at first and then flatten out during baking.


Sunday, July 20, 2008

Book: Speed Cleaning

I read Speed Cleaning by Jeff Campbell. It is a great concept for cleaning the house quickly, but also quite thoroughly. The methods make sense. Pick up this book if you want instructions as to how to quickly do a basic weekly cleaning of your home. He teaches how to clean well and how to clean as efficiently as possible (just not sure I agree they are totally efficient).

Things I didn't like about the book:

I didn't like that he pushed his products and certain cleaners so much. He even said that the vinegar/baking soda -- natural type cleaners don't work as well and I really don't agree with that.

I didn't like that he sometimes just said to do things his way because he said so -- and didn't give reason why it was more efficient/better.

I didn't like that he said don't clean things that you can't see. Just because I can't see it doesn't mean I shouldn't clean it. Dust, bacteria, germs can still build up on areas you don't see.

I think if you don't feel you clean well, don't have time to clean or just need a new way to clean - then pick up the book. It is worth the read. I don't think the methods need to be followed strictly -- take what will help out and ignore the rest.

Wednesday, July 9, 2008

Bread Machine: Potato Herb Rolls


Ingredients:
1 C. plus 2 tablespoons water (70 to 80°F.)
2 T. olive oil
1 t. salt
2 t. dried herbs -- I use more then that and use garlic powder, onion powder, basil and oregano
3 C. bread flour
1/2 C. instant potato flakes or buds
2 T. nonfat dry milk
1 T. sugar
1 1/2 t. bread machine yeast


Topping:
1 egg, lightly beaten

To make dough: Measure all dough ingredients into bread machine pan in the order suggested by manufacturer, adding potato flakes with flour. Process on dough/manual cycle.

When cycle is complete, remove dough to floured surface. If necessary knead in additional flour to make dough easy to handle. Divide dough into 12 equal pieces. Roll each piece to 10-inch rope; coil each rope and tuck end under coil. Place rolls 2 inches apart on large greased baking sheet. Cover; let rise in warm, draft-free place until doubled in size, about 45 to 60 minutes.

To Top:
Brush tops with egg; sprinkle with sesame seed (optional). Bake in preheated 375-degree oven for 15 to 20 minutes or until done. Remove from pan; cool on wire rack.

Note: Dough can be prepared in 1 1/2 and 2-pound bread machines.

Tuesday, July 8, 2008

How to Shape Dinner Rolls


I have dough in the bread machine for herb potato rolls and I wanted another way to shape them then my usual way. I found these sites:


Pillsbury

Cook Illustrated - this is a pdf - but really good source!

Prepared Pantry

And this site only shows one way to shape them but I think it is a good basic one (what I usually do).

Fine Cooking


***photo of the rolls I made -- I did 2 different shapes a double knot and then just a kind of single loop but only double knots showing in this picture

Monday, July 7, 2008

Biscuit Muffins


Biscuit Muffins
Makes 12 muffins

2 1/2 cups all purpose flour
1/4 cup sugar
1 tablespoon plus 1/2 teaspoon baking powder
1/4 teaspoon baking soda
1 teaspoon ground cardamom or ground nutmeg (I used cardamom as I am always looking for recipes with it in it)
1 teaspoon salt
10 tablespoon butter, cold and unsalted, and cut into small pieces
1 cup cold buttermilk
1 tablespoon sugar for sprinkling, optional


Preheat oven to 350 degrees. Grease the cups of a standard muffin tin.

In a large bowl combine flour, sugar, baking powder and soda, nutmeg, and salt. Distribute the butter over the flour mixture, and with a fork, or an electric mixer, work in the butter until coarse crumbs are created.

Pour in the buttermilk, and mix using low speed with a mixer, or a fork, until dough forms a sticky mass, about 30 seconds. Do not overmix, you are just letting the dough come together.

Lightly dust a work surface with flour. Dump the dough out, sprinkle the top with flour, and knead gently, 6-8 times. The dough should remain soft and sticky. Cut the dough into 12 equal portions, and place in greased muffin cups.

Sprinkle with sugar, and bake 25-35 minutes, or until golden brown. Remove pan from oven, and transfer muffins to cooling rack to cool for a few minutes before serving.

***I use powdered buttermilk and they came out great! I just made sure the water was really cold and added the powder with the flour mixture.

Sunday, July 6, 2008

Book: Bread for Breakfast

Bread for Breakfast by Beth Hensperger

I love to read cookbooks. I get into bed under the covers and read them just like I would any other book. And I like to cook. So I sit, go over the ingredients, thinking of them as if I would be mixing up the dough for the breads of this book. This book had many recipes that I would make. I have only made two so far (and both were delicious) but would like to try a few more before returning it to the library. It will be a book I put on my wish list too. It had very easy quick breads to breads ...more I love to read cookbooks. I get into bed under the covers and read them just like I would any other book. And I like to cook. So I sit, go over the ingredients, thinking of them as if I would be mixing up the dough for the breads of this book. This book had many recipes that I would make. I have only made two so far (and both were delicious) but would like to try a few more before returning it to the library. It will be a book I put on my wish list too. It had very easy quick breads to breads that require a little more time and then delicious looking coffee cakes to eat when gathering with friends. Plus some recipes that use bread but are the perfect Sunday breakfast/brunch recipes. I really want to try out each recipe out. The book also has little stories or antidotes with each recipe. And tips also. Good to read and delicious recipes to make!

Tuesday, July 1, 2008

Vanilla Crumb Cake


Makes one 10-inch round coffee cake

Crumb Top
1 1/2 cups cake flour
2/3 cup sugar
1 1/2 teaspoon ground cinnamon
1 teaspoon vanilla extract
10 tablespoons cold unsalted butter - cut into small pieces (1 stick plus 2 tablespoons)


Cake Batter
6 tablespoons unsalted butter - softened (3/4 stick so basically the rest of what was left after the crumb topping)
3/4 cup sugar
3 large eggs
2 teaspoons vanilla extract
2 1/4 cake flour - unsifted
1 1/2 teaspoons ground cinnamon
1 teaspoon baking powder
1 teaspoon baking soda
1/4 teaspoon salt
1 cup sour cream (not fat reduced)

Preheat the oven to 350 degrees (325 degrees for a dark-finish pan). Line a 10-inch springform pan with parchment, grease the bottom and sides and set aside.

To make the crumb top, in the bowl of a heavy-duty electric mixer fitted with the paddle attachment, combine the flour, sugar; and cinnamon. Cut in the vanilla and cold butter on low speed until coarse dry crumbs are formed. Pour into a small bowl and set aside. If not using immediately, refrigerate until needed.

To make the cake batter, without cleaning the mixing bowl, cream the butter and sugar on medium speed until light and fluffy, about 1 minute. Add the eggs, one at a time, and the vanilla extract and beat well on medium speed for 30 seconds. The mixture will be loose. Add the flour; cinnamon, baking powder; baking soda, and salt and beat on low speed for 15 seconds. Add the sour cream and beat on medium-high speed only until the lumps smooth out and the mixture looks fluffy, about 30 seconds on medium-high speed. Do not overbeat.

Spread the batter evenly into the prepared springform pan. Sprinkle the top evenly with the crumb topping. Bake on the center rack of the oven for 45 to 55 minutes, or until the top is crisp and feels firm when gently touched in the center; the cake separates slightly from the sides of the pan, and a cake tester inserted into the center comes out clean (it may be a bit moist; that's okay). Do not overbake, or the cake will be dry.

Remove from the oven and cool in the pan on a wire rack for 5 minutes before removing the sides of the pan. Let cool at least 30 minutes before serving warm, or cover in plastic wrap to serve later at room temperature.

Store at room temperature for up to 3 days.

NOTES:
I made this in a 9x9 square glass cake pan and it worked fine. I have done it in the springform pan and presentation is nice - by cutting into wedges, but works fine in a 9x9 square cake pan too.


Monday, June 23, 2008

Toilet Paper - Over or Under?


I like the toilet paper coming from over the roll. My main reason I do it that way is because I was a maid in a hotel. We were taught that it is over. We were taught it was more "sanitary" over as well as easier to pull and just presentation neater with the little fold corners to give it a tip. Personally it seems to me to rip off easier that way and it just seem less germy then reaching under the roll where you end up touching a lot more roll.

Sunday, June 22, 2008

From Old Bread to Croutons


I take and put stale/close to stale bread in the freezer. And then I take it all out every once in a while and put it through the food processor to make the bread crumbs. Well I hadn't done that in a while and this morning when cleaning out the freezer/fridge (trash day tomorrow), I found quite a lot of bread. So I made up bread crumbs but still had so much bread. We just bought a big container of spring mix salad greens on Friday so I thought croutons. I cut the crust off (saved to make more crumbs from it) and then brushed the fronts and backs with a mixture of olive oil, basil, garlic powder and Parmesan cheese. I then cut the bread into squares and put them on a pan - baked on 350 for about 10 minutes. They smelled delicious and taste really good too.

Friday, June 20, 2008

Mr. Clean Magic Erasers

I mostly clean with natural products - vinegar, baking soda, tea tree oil but there is one product I can't give up that isn't natural. Mr. Clean Magic Erasers. Wal-Mart does have a Great Value equivalent that I have used with almost as much success as the Mr. Clean brand.

Have marks or crayon on your painted walls? Have a scuff on the floor? Want to make your appliances look like new? You know how grease can build on up the indoor grills like the George Formans? I have the Hamilton Beach indoor grill and I take a magic eraser to it regularly and it looks like I took the grill right out of the box. Coffee pot, fridge, stovetop, shower -- all grim comes out fairly easily and again make things look brand new. We live in Western Colorado - 30 minutes from Utah border so we get Colorado type weather but also desert type conditions. The sun hits our white door and gives it brown sun spots. The magic eraser takes them out every time (they do take a little more elbow grease then usual with the Magic Erasers but still worth it and not as much if I was just scrubbing it with a rag.)

I have no idea what that thing is made of but I am so glad to have it around. It just makes me so happy to see things sparkle!

Coupon booklet -- includes Mr. Clean Eraser coupons

**I don't not get paid for this making this tip or any other on this blog. I just recommend things I like

Monday, June 16, 2008

Toffee and Caramel Cheesecake

I made this for a dinner party a while back and you could have heard a pin drop when this was set in front of them. And then the first bit was like little foodgasms going off all around the table.


This recipe was adapted from Epicurious Toffee Crunch Caramel Cheesecake...

Gingersnap crust
Nonstick vegetable oil spray
1 1/2 cups ground gingersnap cookies
1 cup ground peacons
5 tablespoons unsalted butter, melted
2 tablespoons (packed) golden brown sugar

Cheesecake
4 8-ounce packages cream cheese, room temperature
1 cup (packed) golden brown sugar
2 tablespoons (1/4 stick) butter, melted
5 large eggs
2 tablespoons flour
1 teaspoon vanilla extract
1/3 cup toffee bits (Heath Bits O'Brickle)

Caramel topping
1 1/2 cups sugar
1/4 cup water
1/2 teaspoon fresh lemon juice
1 cup heavy whipping cream

OR

Mrs. Richardsons Caramel topping or your favorite caramel topping to save yourself the trouble of making homemade caramel which can at times be a little tricky

1/3 to 1/2 cup toffee bits


Photos of the toffee bits just in case anyone wanted to know what to look for at the supermarket

For Crust: Preheat oven to 350°F. Finely grind ground cookies, pecans and sugar in processor. Add melted butter and blend until combined. Press crust mixture onto bottom of 9-inch-diameter springform pan with 2 3/4-inch-high sides.

For cheesecake: Beat cream cheese and sugar in large bowl until smooth. Beat in flour and butter, then eggs, 1 at a time, until just blended. Beat in vanilla. Pour 1/2 of batter over crust in pan. Sprinkle 1/3 cup toffee bits over the batter. Then pour remaining batter over the bits. Place a large roasting pan or jelly roll pan on lower shelf of oven. Pour water 1/2 way to the lip of the pan. Place cheesecake pan on middle shelf. Bake cake uncovered for 15 minutes at 350. Turn oven down to 250 and bake 30 minutes. Bake 350 for another 15 minutes and then turn down and bake at 250 again for another 15 to 30 minutes. The edges will puff up and the center moves slightly when pan is gently shaken. Total bake time is 1 hour 15 minutes to 1 hour 30 minutes. Remove from oven and cool on wire rack. Slide a knife around the sides and then cover with foil and refrigerate 6 hours to over night.

For topping: 2 hours before serving stir sugar, water, and lemon juice in large saucepan over medium heat until sugar dissolves. Increase heat; boil without stirring until mixture turns deep amber, occasionally swirling pan and brushing down sides with wet pastry brush, about 9 minutes. Add cream (mixture will bubble). Reduce heat to medium-low. Simmer until reduced to 1 1/4 cups, stirring occasionally, about 8 minutes. Chill until thickened but still pourable, about 15 minutes.

Spoon caramel over top of cake just to edges (do not allow caramel to drip down sides). Garnish top edges with chopped English toffee. Chill at least 2 hours.


Tips:
* Adding flour helps it not to crack
* Make sure the cream cheese and sugar are really beaten well before adding eggs. Over beating eggs will add air which causes cracks.
* I never do a waterbath as it always made the crust soggy when I tried so I have done the water in the pan below. Supposedly the moisture in the oven helps to prevent cracking also.
* The reason I do the weird turn up and down of the oven temperature again is to prevent cracking and also over baking the cheesecake.
* Doing this cheesecake 24 hours before eating is always best. It just seems to taste better even better after 24 hours in the fridge.

Thursday, June 12, 2008

White Beans with Pancetta and Sage


White Beans with Pancetta and Sage
1/2 pound large dried white beans -- corona beans (have used lima beans too...whatever larger white bean I can find)
2 bay leaves
3 garlic cloves
1/2 cup all-purpose flour - for dredging
salt and ground black pepper
1/4 cup olive oil
1/4 pound thinly sliced pancetta (when I have not been able to find it as I live in a smaller town I by just regular bacon or some prosciutto)
4 sage leaves - chopped

Prepare beans - put the dried beans in a large bowl and cover with cold water. Soak the beans overnight in the refrigerator.

Drain the soaked beans, place them in a large pot and cover with fresh cold water. Put the beans over medium-high heat and bring to a boil. Toss in the bay leaves and garlic (I also added some of the sage this time and it really added a good flavor to the beans and extra pop of flavor). Reduce the heat to medium and simmer for 1 1/2 hours until tender. Drain the cooked beans and spread them out on a sheet pan to cool slightly and dry off a little.

Put about 1/2 cup of flour in a shallow platter and season it with salt and pepper; mix with a fork to distribute evenly. Toss the beans in the seasoned flour to coat completely.

Place a large skillet over medium-high heat and coat with the oil. When the oil is hot, add the pancetta, fry for a couple of minutes to crisp it up. Toss in the sage leaves and fry for about 1 minute. Remove the pancetta and sage to some paper towels; now you have a flavor base. Shake off excess flour from the beans and put them in the pan in a single layer. Fry the beans for a good 10 minutes to form a golden crust on the outside of the beans, tossing to cook both sides.

Return the pancetta and fried sage to the pan, stir everything together, and serve.

Monday, June 9, 2008

Quick Fix....Special Occasion....& so on

What meal is a quick fix meal for you? The menu for a special occasion? What your favorite comfort food to cook? What favorite dessert to make?

Quick fix meal: Grilled chicken that I let sit in some balsamic vinegar for about 10 minutes. Sprinkle with some grillmate before I throw on the grill*. Baked potato (I microwave them for 4 to 6 minutes depending on size of them and sometimes stick in the oven with a little rock salt and olive oil on the skin for about 10 to 15 minutes while finishing up other things), steamed green beans. It is a quick fix because we get those bags of frozen individual skinless chicken breasts so I take 2 of those out thawing in the microwave for a few minutes if I haven't taken them out in the morning. And then I marinate them for 10 minutes before throwing on the grill for 5 to 7 minutes. It makes a meal done in 30 minutes or less! No I am not Rachael Ray.

Special occasion: Well Master's birthday would be Beef Stroganoff, with a steamed veggie, and garlic toast. That is one of his favorites. Usually special occasion food just is whatever sounds really good at the time. Like we have had a herb crusted roast, roasted veggies with balsamic vinegar, salad, homemade rolls for one anniversary. We had ham with a brown sugar orange juice glaze, creamed potatoes, green beans with roasted red peppers and garlic Parmesan homemade rolls for Christmas. So it really just is decided based on what we are craving or what is the tradition for the occasion.

Favorite comfort food: Take out Chinese! But I guess that is not something I make...well I do make Chinese dishes but usually that is not something I make for comfort food. Comfort food for me....right now has been a casserole I made called Meatball Sandwich Casserole. Nachos are another thing that is comfort food for me. Those are also quick fix meal because just browning ground turkey with taco seasoning and then the fixing is something we always have in fridge and pantry.

Dessert: I love to bake so I am not sure there is a favorite. I really like to make my Mom's homemade chocolate chocolate chip cake. It is very yummy! Some other: sour cream cookies, cinnamon chocolate brownies, chocolate chip cookies, chocolate buttermilk pie, and cream puffs.


*I use an indoor grill - like the George Forman but the one I have is a Hamilton beach with removable grill plates and also other plates for a griddle that I use to make grilled cheese sandwiches or panini's. It is another kitchen appliance that I really like and use a lot!

Tuesday, June 3, 2008

Home Comforts: The Arts and Science of Keeping House

My favorite resource is Home Comforts: The Arts and Science of Keeping House by Cheryl Mendelson

It is a book I have used countless of times. It has everything in it: How to do all basic sewing stitches. How to iron a dress shirt and how to fold sheets. How to make up a bed with hospital corners. How to choose proper sizes for sheets, tablecloths, and other household linens. How to set the table for informal and formal meals. Expert recommendations for safe food storage. The most exhaustive and reliable information on fabrics, textile fibers, and their laundering, and drying. A thorough explanation of care labels and why and how you should often (carefully) disregard them. Housekeeping guidelines for people with pets or with allergies. What to do about dust mites. How to clean and care for wood, china and crystal, jewelry, ceramic tile, metals, and more. Guides to stain and spot removal.  It is a great resource for domestic service.

Just keep in mind while reading this - that is can seem impossible that the author does ALL of the things in this book. My suggestion is to use it as a guide to find things that work for you and incorporate them into your life.

Tuesday, May 27, 2008

THE 10-MINUTE RESCUE

THE 10-MINUTE RESCUE by Mrs. Mary Hunt

The phone rings. Surprise! Long lost friends will be at your front door in 10 minutes. You have no time to clean the house. What you need is a 10-minute rescue. This is a terrific technique you should learn right now, and then keep tucked away for that time when despite your best efforts, you’re caught in a jam. So, are you ready? Go!

1. Set a small pan of water over medium heat. Dump in spices like cinnamon, allspice and cloves and leave it to heat.

2. Grab a box or grocery bag. Move through the house starting in the kitchen clearing counters, coffee tables, end tables and all other flat surfaces of clutter. Just scoop everything into the container and stash it in a closet.

3. Gather all bathroom clutter including towels, stuff lining the walls and ledges of the tub and shower, toys, and all the stuff on the vanity and deposit it in the tub or shower. Draw the curtain.

4. Clean all the flat surfaces you have just cleared using furniture polish or all-purpose cleaner as appropriate.

5. Empty the kitchen sink of dishes, pots and so on using the stash methods described above if necessary. The oven and dishwasher are handy hiding places. Scrub the sink, rinse quickly and perform a quick polish.

6. Starting at the front door vacuum the visible areas.

7. Light the candles and the fireplace.

8. Switch on the stereo and turn down the lights.

Whew! You made it. The house looks great. Smells good, too. Enjoy your company and when they are gone, take a few more minutes to go through the box in the closet, the pile in the tub and, above all, anything you stashed in the oven!

** Just remember to clean out all the places you stashed stuff after. I know when I was a young housewife I forgot that pile of pans was in the oven and turned it on to preheat! It wasn't a good experience. Also this really seems like it would take more then 10 minutes but it is a quick clean up if you have guests dropping by!

Wednesday, May 21, 2008

Maple Fudge

1 can sweetened condensed milk

1 cup brown sugar

1 1/4 cups butterscotch chips

2 sticks of butter

3 teaspoons maple extract

Place all ingredients except the maple extract into a 2-quart microwave safe mixing bowl and microwave on high for 10 minutes, stopping and stirring every 2 minutes. THE MIXTURE IS VERY HOT - so be CAREFUL! Let cool slightly and then beat with a mixer for 2 minutes. Add the extract and beat for another 3 to 4 minutes. It almost looks caramel in texture but it does come out fudge consistency.

Spread mixture into a parchment paper-lined 8 x 8 inch square pan or you can also just butter the pan really well. I have done fudge both ways and it works fine. Chill to set and then cut into squares. I think it was close to 60 to 64 squares.

LinkWithin

Related Posts Widget for Blogs by LinkWithin